Knowing how to measure group size in MOA is the difference between guessing whether a load is improving and actually knowing. Two shooters can fire the “same” 0.6-inch group at different distances and be shooting completely differently — because raw inches don’t tell you how the rifle is really performing. Minute of angle (MOA) does. This guide covers what MOA and MIL really are, how to measure a group the correct center-to-center way, the formulas with worked examples, and the fastest way to get an exact number straight from a photo of your target.
In this guide
- What is MOA?
- What is MIL (and how it compares to MOA)?
- How to measure your group: center-to-center
- How to measure group size in MOA: the formula
- Converting a group to MIL
- Extreme spread vs. mean radius: why one number is not enough
- How many shots should you measure?
- Common mistakes
- The fast way: measure group size in MOA from a photo
What is MOA?
MOA stands for minute of angle — one-sixtieth of one degree. Because it is an angle, the physical size it covers grows with distance. At 100 yards, 1 MOA equals almost exactly 1.047 inches (most shooters round to “an inch at 100 yards,” which is close but not exact). At any range, multiply: 1 MOA ≈ 1.047 in × (yards ÷ 100). If you want the geometry, here is the full definition of a minute of arc.
| Distance | 1 MOA ≈ | 1 MIL ≈ |
|---|---|---|
| 100 yd | 1.047 in | 3.6 in |
| 200 yd | 2.09 in | 7.2 in |
| 300 yd | 3.14 in | 10.8 in |
| 600 yd | 6.28 in | 21.6 in |
| 1000 yd | 10.47 in | 36 in |
Why bother with an angular unit instead of inches? Two reasons. First, it lets you compare groups fired at different distances on equal footing — a 1-inch group at 100 yards and a 2-inch group at 200 yards are both 1 MOA. Second, your scope adjusts in angular units (most commonly 1/4 MOA per click), so thinking in MOA makes zeroing and holdovers intuitive.
What is MIL (and how it compares to MOA)?
A milliradian (MIL or mrad) is another angular unit: one-thousandth of a radian. At 100 yards, 1 MIL equals 3.6 inches (or a tidy 10 cm at 100 meters), and it scales the same way: 3.6 in × (yards ÷ 100). The two units convert cleanly: 1 MIL = 3.438 MOA. Neither is “better” — use whichever matches your scope turrets and reticle so your math and your dials agree.
How to measure your group: center-to-center
The standard measure of group size is the center-to-center (CTC) distance between the two shots farthest apart — also called extreme spread. You do not measure to the ragged edges of the holes; you measure between the centers of the two widest. With calipers, the easy method is:
- Find the two bullet holes that are farthest apart.
- Measure outside edge to outside edge of that pair.
- Subtract one bullet diameter (e.g., 0.264" for a 6.5 mm, 0.308" for a .308).
- The result is your center-to-center group size in inches.
Subtracting one bullet diameter converts the outside-to-outside measurement to center-to-center. (Bullet holes in paper are often a hair smaller than the bullet, but bullet diameter is the accepted convention.)
How to measure group size in MOA: the formula
Once you have the group in inches and you know the distance, the conversion is simple:
MOA = group size (inches) ÷ [ 1.047 × (distance in yards ÷ 100) ]
Worked examples:
- A 0.62" group at 100 yd → 0.62 ÷ 1.047 = 0.59 MOA.
- A 1.25" group at 200 yd → 1.25 ÷ 2.094 = 0.60 MOA.
- A 2.0" group at 300 yd → 2.0 ÷ 3.141 = 0.64 MOA.
If you use the “1 inch = 1 MOA” shortcut you will overstate your group by about 4.7% — fine for a quick gut check, but use 1.047 when you are recording data you will compare later.
Converting a group to MIL
For MIL, divide by 3.6 instead of 1.047: MIL = inches ÷ [ 3.6 × (yards ÷ 100) ]. That 0.62" group at 100 yards is 0.62 ÷ 3.6 = 0.17 MIL. Or just convert from MOA: 0.59 MOA ÷ 3.438 = 0.17 MIL. Shooting metric? At 100 m, 1 MIL = 10 cm, so a 1.7 cm group is 0.17 MIL.
Extreme spread vs. mean radius: why one number is not enough
Center-to-center extreme spread is the number everyone quotes, but it has a weakness: it is defined entirely by your two worst shots. One flyer can double it, and it ignores how tightly the rest of the group clustered. That makes it noisy, especially with few shots.
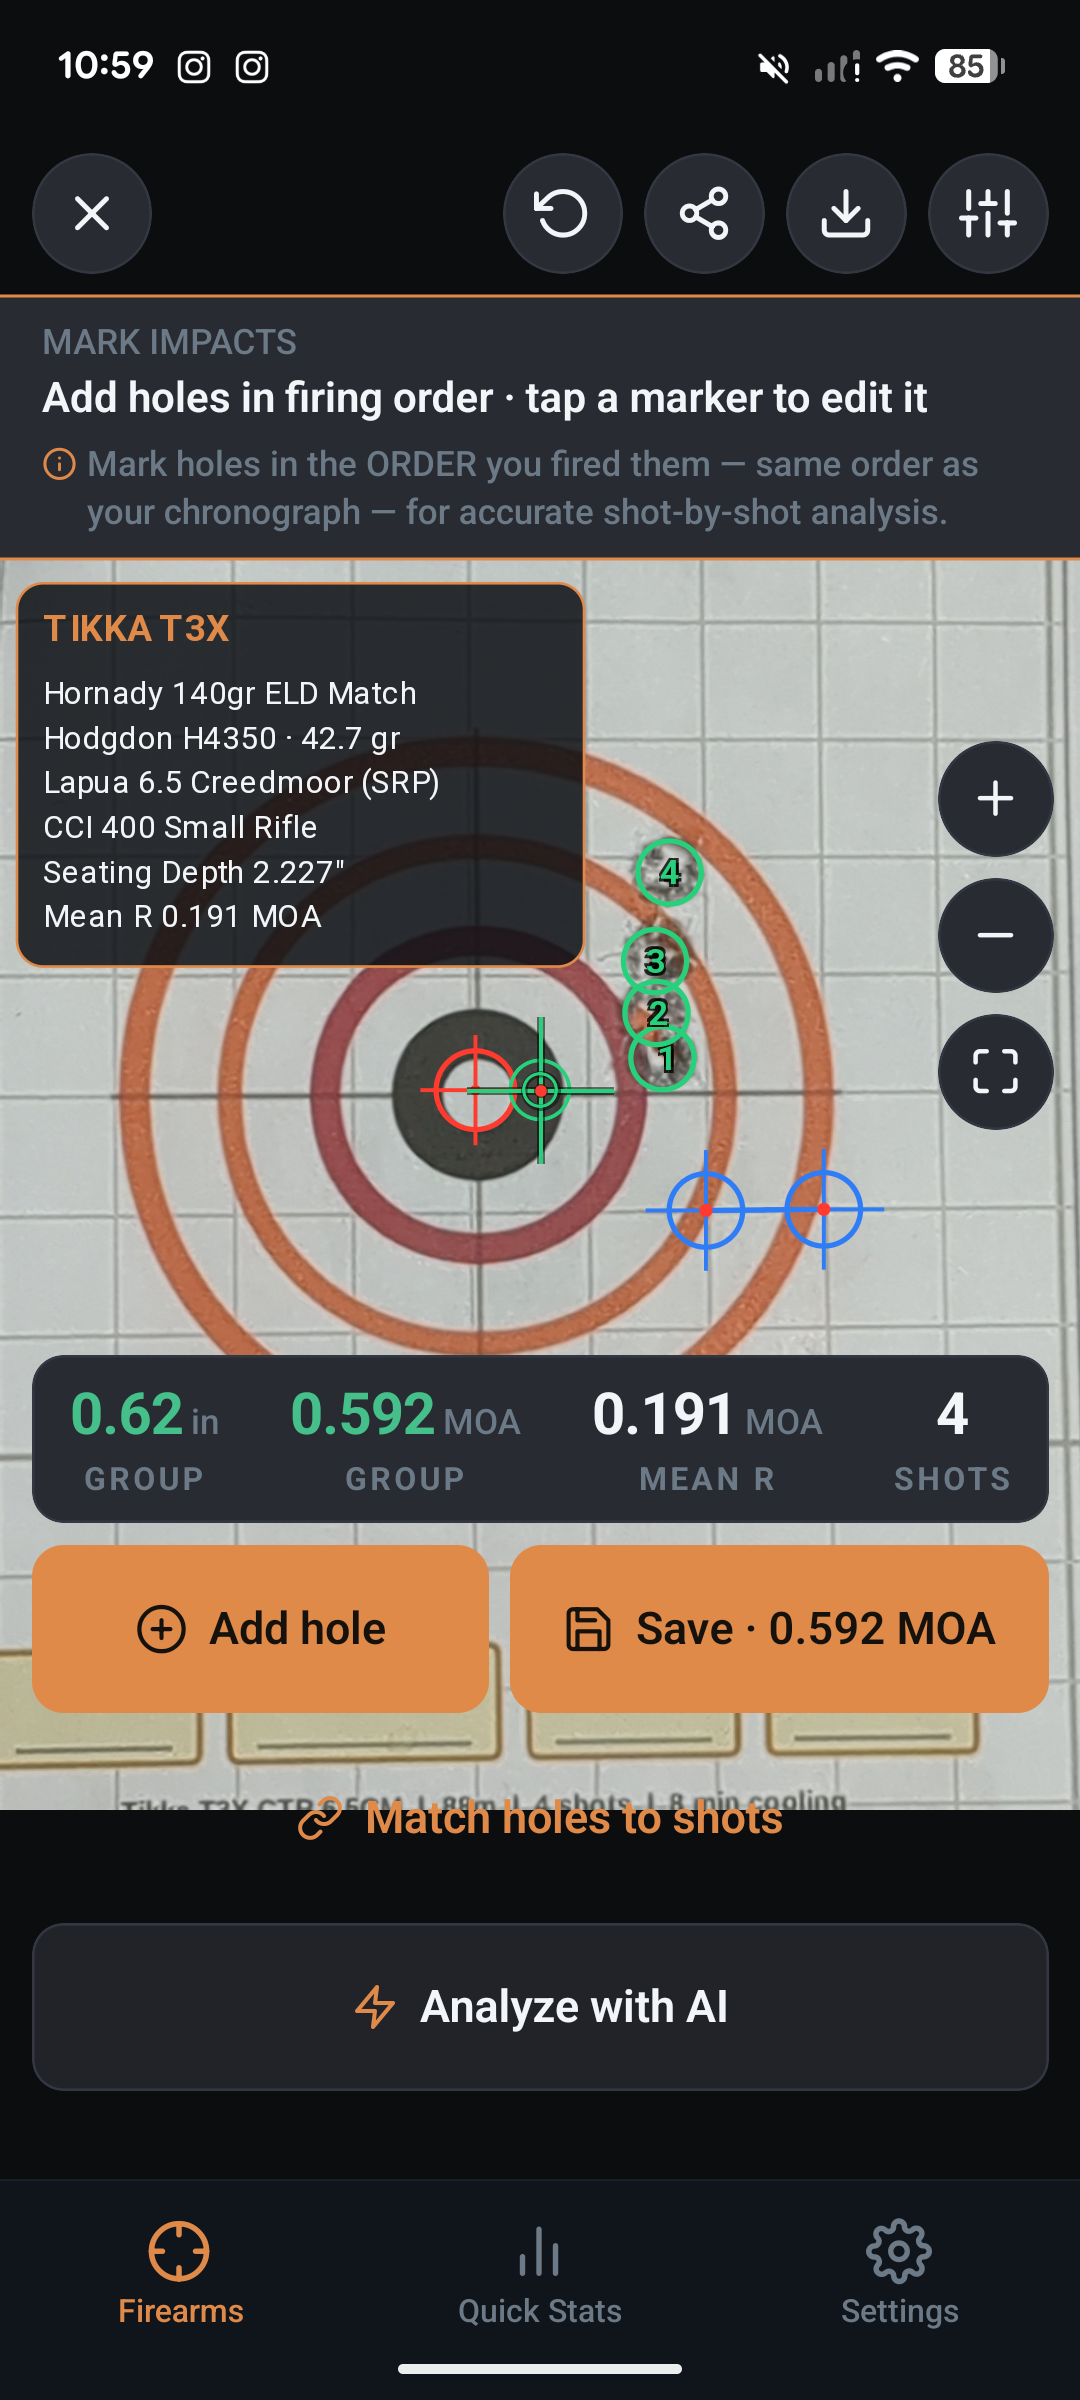
Mean radius — the average distance of every shot from the group center — uses all of your data, so it is far more stable and repeatable from group to group. It is the better metric for comparing one load against another. (LoadNode reports both, in MOA and MIL.)
How many shots should you measure?
Three-shot groups flatter you — they consistently understate true dispersion because there simply are not enough shots to catch the outliers. Five shots is a reasonable minimum; ten shots (or several groups aggregated) gives a far more honest picture of what your rifle and load actually do. The more rounds behind the number, the more you can trust it. Whatever the count, record the group size in MOA rather than raw inches, so the figure means the same thing at every distance.
Common mistakes
- Forgetting to subtract bullet diameter — inflates every group.
- Measuring the wrong pair — the widest two holes are not always the obvious ones.
- Using 1" instead of 1.047" at long range, then wondering why your data drifts.
- Comparing groups in inches across different distances — always convert to MOA or MIL first.
- Judging a load on a single 3-shot group — shoot more before you decide.
The fast way: measure group size in MOA from a photo
Calipers and a calculator work, but they are slow and easy to fat-finger. LoadNode does the whole thing from a photo of your target: snap it square-on, set a known distance to calibrate the scale, then tap each hole. It computes center-to-center group size, MOA and MIL, mean radius, and your point-of-impact offset — and links the result to the exact load that produced it, so your data builds into something you can actually learn from. No transcription, no arithmetic errors.
However you measure, learning to measure group size in MOA turns “looks pretty good” into numbers you can track load over load — which is the entire point of load development. For more, see our reloading resources.
Handloading is an adult activity. LoadNode is a logbook and analysis tool — it never provides load data. Always develop loads from current published data and work up safely.