Category: Reloading Guides

  • The Honest Answer: Do You Need a Chronograph to Reload?

    The Honest Answer: Do You Need a Chronograph to Reload?

    If you spend any time on reloading forums or talking to experienced handloaders at the range, one question surfaces constantly: do you need a chronograph? The honest answer is no: you can reload safely using published data from a reputable manual without ever owning one. But if you care about repeatable accuracy beyond 200 yards, a chronograph is arguably the single highest-value tool you can add to your workflow. Here is the full, unvarnished breakdown.

    do you need a chronograph: a precision rifle set up in front of a target

    What a Chronograph Actually Measures

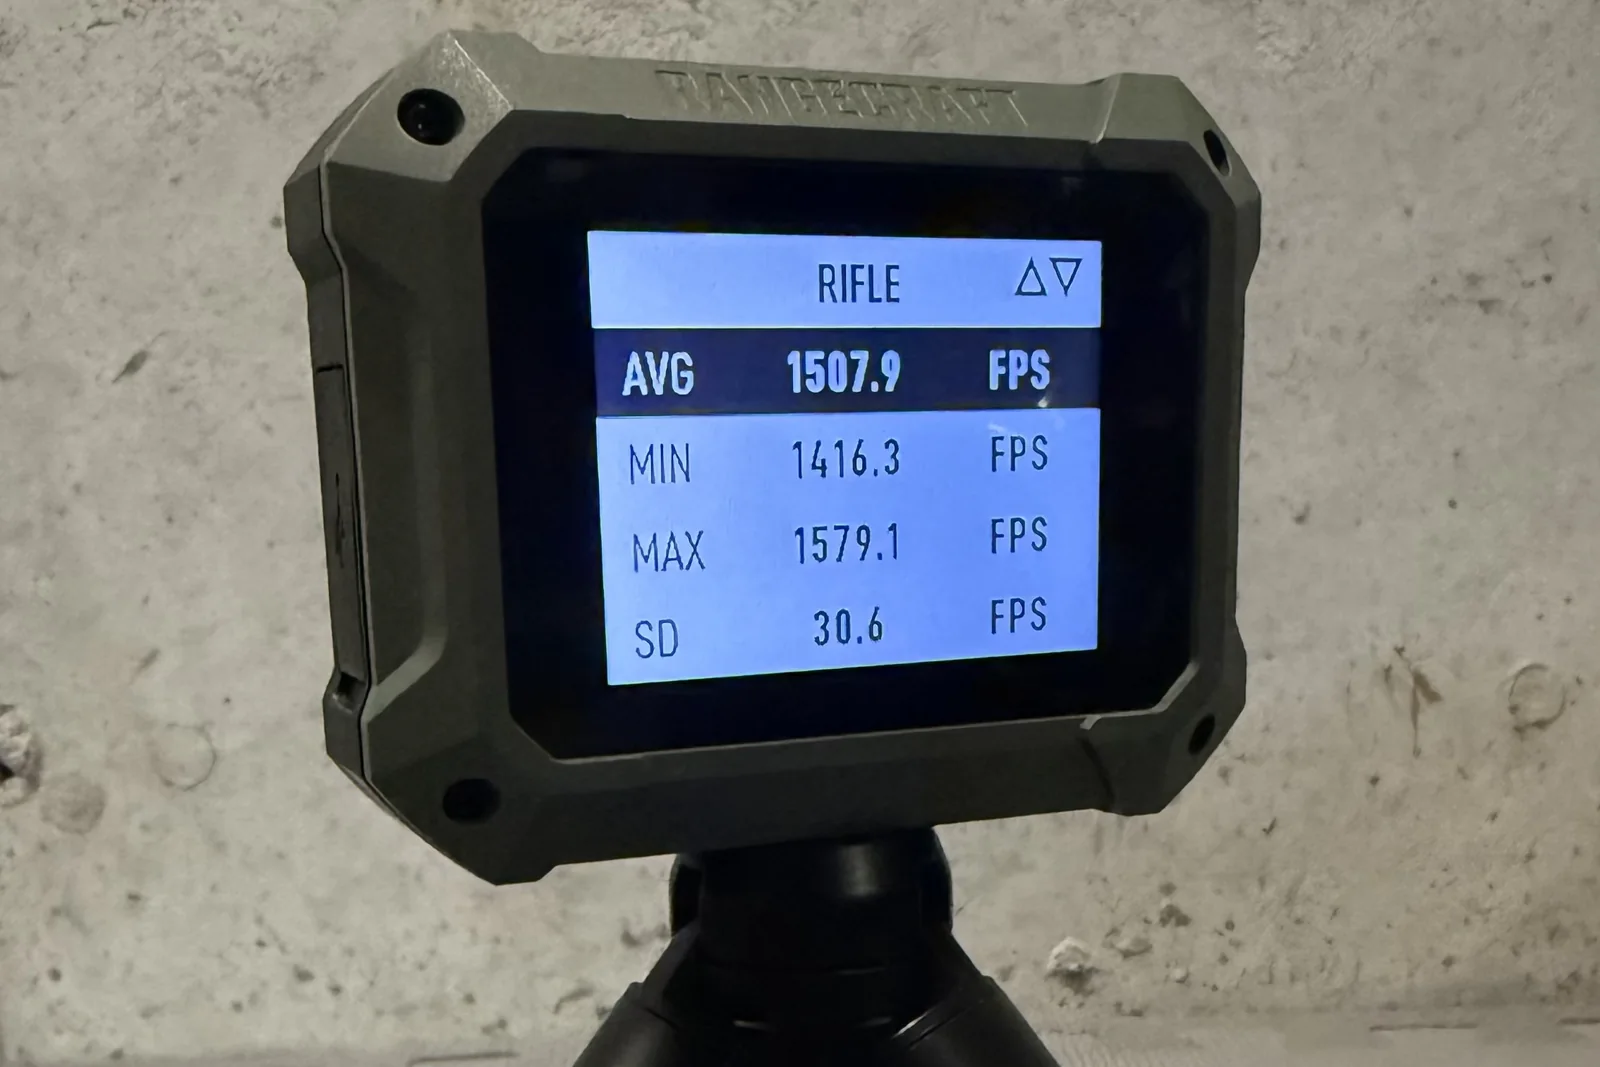
    A firearms chronograph measures muzzle velocity (MV): the speed of a bullet as it exits the barrel, expressed in feet per second. One shot gives you a number. A string of shots gives you a story. From any string, a modern chronograph produces three figures that matter:

    • Average velocity: your baseline MV for every ballistic calculation you run
    • Standard Deviation (SD): how tightly individual shots cluster around that average
    • Extreme Spread (ES): the gap between the fastest and slowest round in the string

    SD and ES are where the real value lives. Low SD means consistent pressure and burn from shot to shot. High SD signals that something, primer variation, case capacity spread, powder metering inconsistency, is introducing noise at the source. For a deeper look at what these numbers should actually look like, see our guide on what is a good SD for reloading.

    Why Velocity Consistency Matters Downrange

    Velocity variation becomes vertical dispersion on paper, and distance is the amplifier. At 100 yards, even a wide ES is hard to detect: the difference between a faster and slower shot may land within an inch or two of each other. Stretch that to 500 or 1,000 yards and physics magnifies every inconsistency. Research from precision shooting communities consistently shows that a 20 fps swing in muzzle velocity produces measurable vertical stringing at long range: faster rounds land high, slower ones land low. At 1,000 yards on a transonic cartridge, that kind of ES can mean the difference between a hit and a clean miss.

    There is a second, often overlooked problem: the velocity printed on the box is not your rifle’s velocity. Ammunition manufacturers test in SAAMI-standard barrels, typically 24 inches, under controlled laboratory conditions. Your barrel length alone can account for 20–35 fps per inch of deviation from that standard. Add chamber dimensions, bore diameter variation, and ambient temperature, and the gap between box spec and real MV grows further. Without a chronograph, every DOPE card come-up and every ballistic solver input is built on someone else’s data from a barrel you have never shot. That error compounds with every yard of distance. Learn more about building a true firing solution in our guide to building a DOPE card.

    Do You Need a Chronograph for Short-Range Shooting?

    If your shooting stays inside 200 yards, casual target practice, short-range hunting, plinking, then whether do you need a chronograph is a real priority is debatable. Published data from a reputable manual gives you a safe starting point, and the margin for error at short range absorbs modest velocity variation without meaningful consequence on target.

    Where the calculus shifts is when you start holding over at 400, 600, or 800 yards. At that point, an accurate muzzle velocity is the foundation of every come-up you trust. A reasonable estimate, even an educated one, drifts you off target in ways that are genuinely difficult to diagnose without knowing your actual MV. At distance, invisible variation becomes the problem: and a chronograph is what makes it visible.

    Types of Chronographs: Optical, Barrel-Mounted, and Doppler Radar

    Three main categories define today’s market, each with genuine trade-offs:

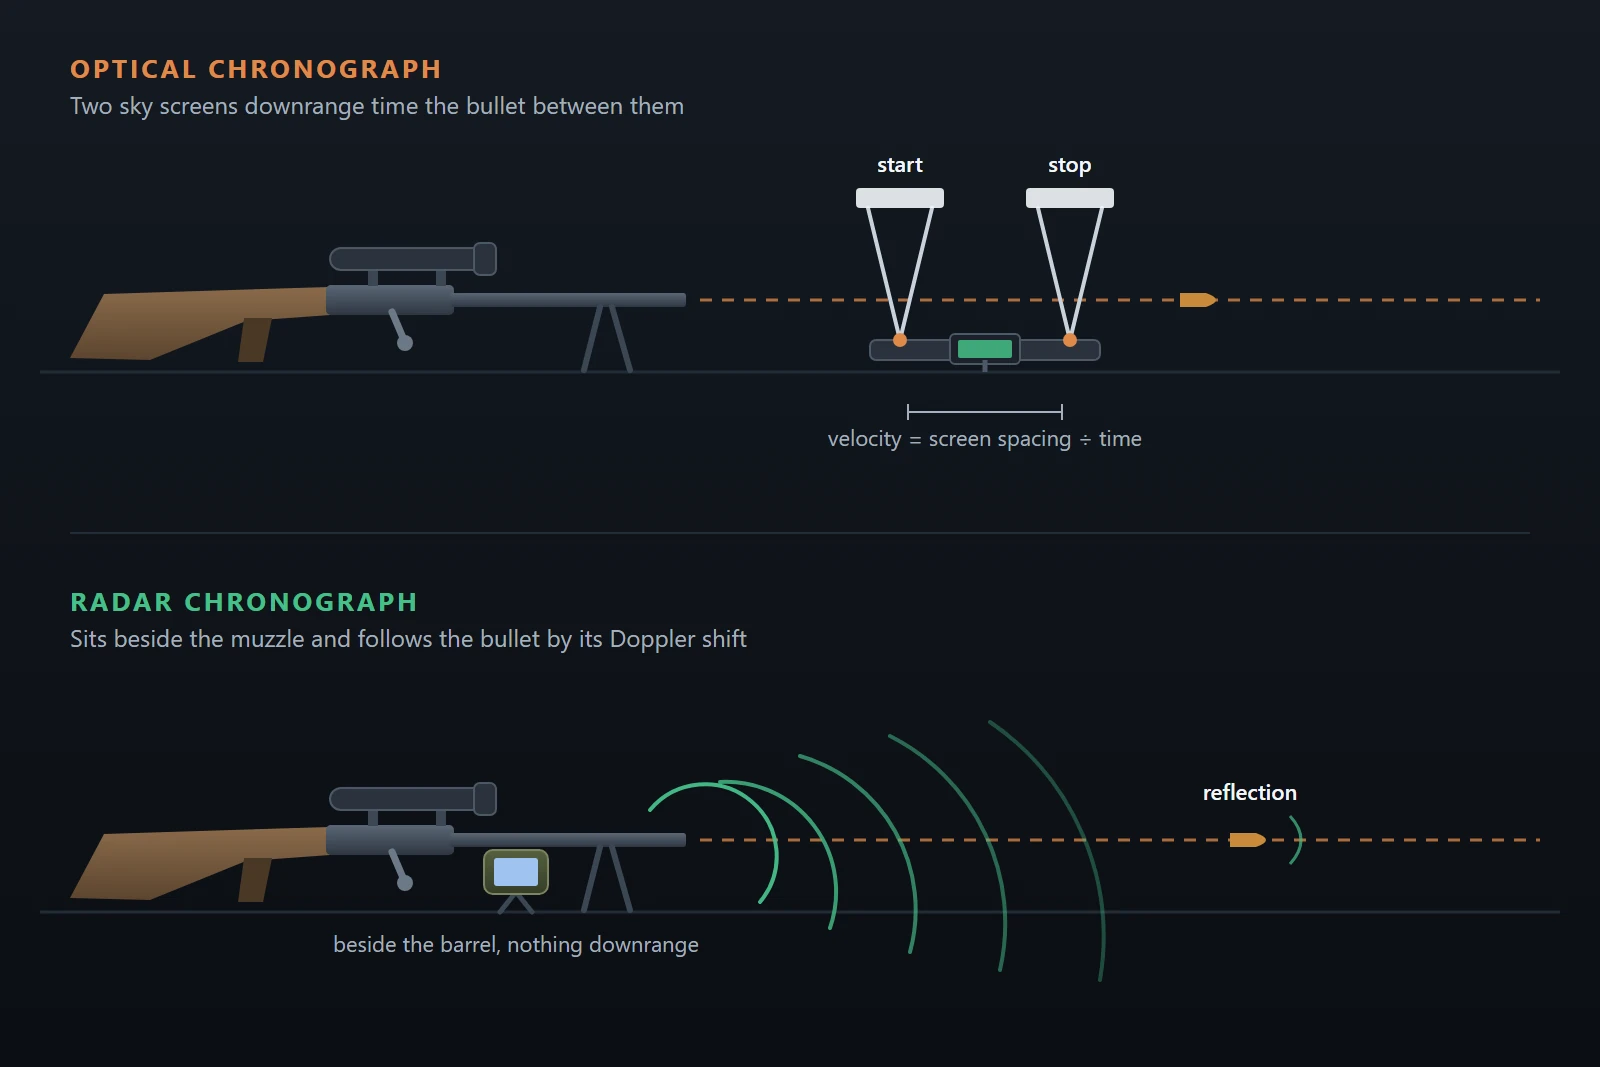
    Optical chronographs use light sensors on a downrange stand. A bullet breaks the beam in sequence and the device calculates velocity from travel time. These are the most affordable entry point, often under $100, but cloud cover, harsh sun angle, and indoor lighting can all skew readings. They also require you to shoot directly over the unit, which leaves no margin for a poorly centered shot.

    Barrel-mounted units (MagnetoSpeed being the dominant name) strap a sensor bayonet to the barrel and detect the bullet electromagnetically. Light-independent and highly repeatable, but strapping weight to the muzzle alters barrel harmonics and shifts point of impact. These work well for pure velocity-development sessions where you accept that your groups may not be representative until the unit comes off.

    Doppler radar units are the current gold standard for most serious reloaders. Units like the Garmin Xero C1 Pro and the newer Garmin Xero C2 sit beside the shooter, require no downrange setup, and use microwave pulses bounced off the bullet in flight. No light dependency, no barrel contact, no downrange risk. The C1 Pro fits in a coat pocket and reads from 100 to 5,000 fps within 0.1% accuracy. The C2, launched in early 2026, adds rapid-fire sampling, reinforced construction for direct rifle mounting, and Applied Ballistics smartwatch integration. See how both units compare for load work in our Garmin Xero velocity data guide and the dedicated Xero C2 live-capture walkthrough.

    Making the Data Work: Logging Every String

    Getting a velocity string is only as valuable as what you do with it afterward. The most common failure mode is noting the average MV, pocketing the unit, and forgetting the SD before you ever cross-reference it against your load records. The numbers belong in your load history, tied to the session, the conditions, and the rifle they came from, so they can inform future decisions at the bench and at distance.

    LoadNode logs every velocity string you record, with live SD and ES calculated and tied to the exact load session. When you sync a Garmin Xero C1 via saved-session pull, or capture shots live with the C2, each velocity populates your load history automatically. That turns a number on a screen into a permanent, searchable data point linked to everything else you know about that combination: brass, primer, bullet, and environmental conditions. The result is a record that actually sharpens your decisions over time rather than disappearing with the next range trip. Visit the LoadNode home to see how it all fits together, or read the full walkthrough on how to use a chronograph effectively with a logbook workflow.

    Do You Need a Chronograph? The Bottom Line

    To ask do you need a chronograph is really to ask how seriously you take long-range consistency. For safe reloading at close range, the answer is genuinely no: published data and careful technique are enough. For anyone building a true DOPE card, chasing tight groups past 300 yards, or trying to understand why one string shoots differently than the last, a chronograph does not just help: it is the only tool that converts invisible velocity variation into numbers you can actually work with. That is a hard thing to replace.

    Handloading is an adult activity done at your own risk. LoadNode is a logbook and analysis tool: it never provides load data. Always develop loads from current published manufacturer data and work up safely.

  • Complete Reloading Equipment List: What Every Beginner Needs

    Complete Reloading Equipment List: What Every Beginner Needs

    Searching for a complete reloading equipment list is one of the first things new handloaders do: and one of the most confusing. Dozens of tools show up, and it’s rarely clear which ones are day-one necessities versus which are smart upgrades for later. This guide organizes everything into two tiers: essentials you genuinely cannot skip, and precision add-ons worth adding once the fundamentals are solid. Whether you’re still working out how to start reloading or you’re actively stocking a new bench, use this checklist as your buying roadmap.

    reloading equipment list: assorted rifle cartridges and ammunition boxes

    The Essential Reloading Equipment List

    These are the non-negotiables. Miss any one of them and you cannot complete a round of ammunition safely.

    1. A Reloading Press

    The press is the mechanical heart of your bench. Three designs dominate the market:

    • Single-stage: one die at a time, one operation per stroke. Output is roughly 50 rounds per hour, but every step is visible and easy to verify while you’re still building habits. The standard starting point, particularly for rifle cartridges.
    • Turret press: holds a full die set in a rotating head. Advance the turret between strokes instead of swapping dies, reaching ~200–250 rounds per hour with most of the control of a single-stage. A natural step up once the basics are second nature.
    • Progressive press: completes one round per stroke by working multiple cases at once, reaching 500–800 rounds per hour. Highly efficient for pistol volume, but the complexity rewards reloaders who already understand exactly what each stage is doing.

    The honest guidance: start on a single-stage or auto-indexing turret. Our breakdown of whether reloading is worth it includes a cost-versus-volume analysis that can sharpen this decision.

    2. Die Set and Shell Holder

    Dies are caliber-specific. A standard two-die rifle set includes a full-length sizing die, which resizes the case body and decaps the spent primer, and a seating die that seats the bullet to the correct depth. The shell holder locks the case head into the press ram; match it to your cartridge family. Buying dies from an established maker pays dividends in consistent, repeatable sizing.

    3. A Reliable Scale and Powder Measure or Trickler

    Powder charge accuracy is the most safety-critical measurement in reloading. Your scale must be trustworthy. The main options:

    • Beam (balance) scale: immune to electromagnetic interference and power fluctuations; no batteries to go flat; the reference standard many experienced reloaders still use.
    • Quality digital scale: faster and easier to read, but strain-gauge designs can drift with temperature changes. Always verify against check weights at the start of every session.
    • Powder measure and trickler: a volumetric measure throws repeatable bulk charges quickly; a trickler lets you add single kernels to the pan until the scale reads exactly right. Together, these make precise charging practical at the bench.

    Do not cut corners on your scale. It is not the place to save money.

    4. Calipers and Ideally a Case Comparator

    A 6-inch dial or digital caliper lets you measure overall cartridge length, trim length, bullet seating depth, and more. A case comparator, a set of inserts that index off the datum line of the case shoulder, tells you far more about headspace than overall case length alone. If you plan to reload for precision or accuracy work, the comparator is a worthwhile early purchase.

    5. Case Preparation Tools

    Fired brass needs work before it can be safely reloaded. Your case prep kit should cover four tasks:

    • Case lube: applied before sizing to prevent brass from sticking in the die. Essential for all bottleneck rifle cartridges.
    • Case trimmer: brass stretches slightly with each firing cycle; trimming returns cases to the correct length before reloading.
    • Chamfer and deburr tool: bevels the case mouth for smooth bullet seating and removes burrs left by trimming.
    • Primer pocket cleaner: clears carbon residue from the primer pocket so primers seat to a consistent depth.

    Our guide to brass prep for accuracy covers each step in depth and shows what skipping any of them costs you at the target.

    6. A Priming Tool

    New primers must be seated into clean primer pockets after sizing. Many presses include an on-press priming arm, which works fine. A dedicated hand priming tool, a palm-sized device with a lever and a primer tray, gives better tactile feedback: you can feel each primer seat flush and firm, which matters for consistent ignition. Precision reloaders generally favour the hand tool for exactly this reason.

    7. A Loading Block

    A simple plastic or wooden block that holds cases upright during charging. After throwing powder into each case, visually scan the entire block before seating any bullets. An over- or under-charged case is visible at a glance from the side. Cheap, takes up almost no space, and forms the foundation of a safe charging routine.

    8. A Current Reloading Manual: Non-Negotiable

    A current edition manual from a major manufacturer: Hornady, Lyman, Sierra, Nosler, or similar: is the only source you should trust for published data. Manuals are updated as new powders and projectiles come to market; an outdated copy may not reflect current data. Own a physical edition and keep it at the bench. Online forum posts are not a substitute. This is equipment, not optional reading.

    Nice-to-Have Additions to Your Reloading Equipment List

    Once the essentials are dialled in, these tools extend your capability: especially if you reload for precision rifle, long-range hunting, or any application where consistency at distance matters.

    • Concentricity gauge (runout gauge): measures how well the bullet aligns with the case axis. Even a few thousandths of an inch of runout introduces variables that only reveal themselves at distance. Useful for identifying and sorting high-runout rounds before they leave the bench.
    • Brass annealer: restores neck and shoulder temper that work-hardens with each firing cycle. Consistent neck tension leads to more consistent velocities, particularly across large lots of once-fired brass. Induction annealers offer the most repeatable results; flame-based annealers are available at a lower entry cost.
    • Bushing neck-sizing dies: replace the standard sizing button with an interchangeable bushing matched to your specific neck diameter. This gives precise control over neck tension without turning necks and reduces work hardening over the life of the case.
    • Vibratory tumbler or ultrasonic cleaner: clean brass lubricates more evenly, feeds more smoothly through dies, and seats primers more consistently. A vibratory tumbler with walnut or corncob media is the standard entry-level option; ultrasonic cleaners also work the inside of the case and the primer pocket.
    • Chronograph: not a bench tool, but the most useful instrument for understanding what your handloads are actually doing downrange. Consistent muzzle velocity is your primary ballistic quality indicator. See our guide on how to use a chronograph to turn those numbers into actionable data.

    Now Log What You Load

    Building a solid reloading equipment list and purchasing quality tools is the first investment. The second, and one most reloaders underestimate, is keeping records detailed enough to replicate what works and diagnose what doesn’t. Which die settings produced that tight group? What seating depth, which primer lot, how many firing cycles on this brass? Without a logbook, you lose that knowledge every time you step away from the bench.

    LoadNode is built for exactly this. Log your components, die settings, case prep notes, and session results in one place. When you connect chronograph data to your load records, you can see at a glance which combinations delivered the tightest velocity spreads: and reproduce them. Your reloading equipment list represents a real investment of time and money. LoadNode is how you make that investment pay off in better, more consistent ammunition every time you sit down to work.

    Handloading is an adult activity done at your own risk. LoadNode is a logbook and analysis tool: it never provides load data. Always develop loads from current published manufacturer data and work up safely.

  • The Honest Answer: How Many Times Can You Reload Brass

    The Honest Answer: How Many Times Can You Reload Brass

    If you’ve ever asked how many times can you reload brass and walked away with a different number from every reloader in the room, that’s not evasion: it genuinely depends. Cartridge type, chamber pressure, sizing method, annealing schedule, and even the brand of brass all shift that number dramatically. This guide gives you realistic firing‑count ranges by cartridge type, explains every variable you can actually control, and walks you through the four failure signs that tell you a case has reached the end of its service life.

    how many times can you reload brass: a pile of fired brass cartridge cases

    How Many Times Can You Reload Brass? Ranges by Cartridge Type

    The answer to how many times can you reload brass starts with what you’re shooting. Here are realistic, community‑confirmed ranges: not best‑case marketing figures.

    Bolt‑action rifle brass typically delivers 5–10 firings under normal conditions. Controlled extraction and tight chamber support are far gentler on brass than a semi‑automatic’s fast camming action. Reloaders who neck‑size only, bump the shoulder minimally, and anneal on a regular cadence routinely push runs well beyond ten. Premium brass from makers like Lapua and Peterson is manufactured to tighter tolerances with a harder case web; reloaders regularly report 12–20 or more firings from these lots.

    Semi‑automatic and AR‑platform rifle brass ages faster: expect 3–6 firings under normal use. The fast, hard extraction of a gas‑operated action stretches cases more aggressively per cycle, and brass that ends up on hard surfaces accumulates additional deformation that shortens usable life further.

    Straight‑wall pistol and revolver brass lives longest. Operating at a fraction of rifle pressures, cartridges like .45 ACP, .38 Special, and .357 Magnum commonly survive 15–20 reloads or more. Some competitive shooters running mild loads report stopping the count past 20 because the brass still looks serviceable. Higher‑pressure pistol rounds, 9mm and .40 S&W among them, deliver fewer cycles than their lower‑pressure siblings, though typically still more than bottleneck rifle brass.

    What Shortens Brass Case Life

    • High operating pressure. Every firing expands brass against the chamber walls. Higher pressure means more metal flow per cycle, which thins the web and loosens primer pockets faster.
    • Excess shoulder bump. Full‑length sizing done aggressively, pushing the shoulder back more than a few thousandths, works the brass harder than the chamber requires and accelerates case‑body stretch.
    • Semi‑automatic extraction. Fast, hard ejection stretches cases further per cycle than a manual bolt action does, regardless of pressure level.
    • Skipping annealing. Without periodic heat treatment the neck and shoulder work‑harden progressively until they crack or split: often without warning.
    • Overflaring or overcrimping pistol case mouths. Repeatedly belling and then crimping the case mouth fatigues the brass at the neck faster than firing itself does.

    What Extends Brass Case Life

    • Regular annealing. Annealing the neck and shoulder restores the ductility that firing removes. Reloaders who anneal every firing, or every two to three firings, consistently report more usable life and tighter neck‑tension consistency from the same lot.
    • Minimal, consistent shoulder bump. Move the shoulder only as far as your chambering demands, and keep that dimension repeatable across every case in the lot.
    • Neck sizing for bolt actions. Neck sizing only works far less metal than full‑length sizing and measurably extends case life when a single firearm is in the rotation.
    • Bushing dies. Bushing dies without an expander ball work the neck once per cycle instead of twice, reducing cumulative metal fatigue with every reload.
    • Thorough first‑fire prep. Starting with properly prepped brass, trimmed to length, deburred, and annealed, sets the lot up for the longest possible run before any failure mode appears.

    Four Signs It’s Time to Retire a Case

    Knowing how many times can you reload brass by the numbers matters less than catching these failure signs before they become a safety issue. Any one of the four below means the case goes in the scrap bin, not back in the loading block: regardless of firing count.

    1. Incipient case‑head separation. This is the most dangerous failure mode in rifle brass. As brass flows forward under repeated pressure cycles, the web just above the extractor groove thins. Before it splits completely, an internal groove forms at that thinned zone: sometimes visible from outside as a bright ring. To check: straighten a paper clip, bend a 90‑degree foot about 3 mm long at one end, then drag the bent tip slowly around the inside wall of the case just above the web. Any catch or depression you feel means the case is compromised. Discard it immediately and never re‑fire it.

    2. Loose primer pockets. A primer should require firm, consistent thumb pressure to seat fully. If it slides in with little or no resistance, or falls out during handling, the web has expanded past spec and the case is done.

    3. Neck splits and cracks. Visible cracking or splitting in the neck or shoulder is immediate grounds for retirement. Work‑hardened brass that has not been annealed on a regular schedule will crack; there is no repair once it does.

    4. Excessive length growth. Cases stretch with every firing, and trimming to spec is normal maintenance. When you find yourself trimming the same lot back to minimum length every single cycle, the brass is nearing the practical end of its workable life and deserves more aggressive inspection with every subsequent pass.

    Why Tracking Firing Count Is the Real Answer

    Most reloaders who ask how many times can you reload brass make the same mistake: they do everything right with prep, sizing, and annealing: and then never write down how many times each lot has been fired. Without a firing count you’re managing brass by intuition rather than data, and you can’t know when a lot is approaching end‑of‑life until a case gives you a sign at the bench.

    LoadNode records the brass firing generation automatically with each logged session, so you always know exactly where a lot stands. You can group brass by maker, lot number, and firing count, and the app amortizes brass cost across firings so you see the true per‑round cost as the lot ages toward retirement. When a lot approaches the typical end‑of‑life range for its cartridge type, you know to start inspecting harder: and to budget for a replacement lot before the current one is entirely spent.

    The honest answer to how many times can you reload brass is the number your own records show: calibrated against the ranges above and cut short the moment any failure sign appears. Track every firing, inspect every case, and retire on evidence rather than habit. That is how you keep brass cost low, performance consistent, and every range session as safe as the first.

    Handloading is an adult activity done at your own risk. LoadNode is a logbook and analysis tool: it never provides load data. Always develop loads from current published manufacturer data and work up safely.

  • Essential Reloading Safety: 10 Rules To Follow

    Essential Reloading Safety: 10 Rules To Follow

    Reloading safety is not a supplementary concern: it is the foundation on which every session at the bench is built. The rules that govern safe handloading have been developed through the combined experience of the industry, component manufacturers, and organizations such as SAAMI (the Sporting Arms and Ammunition Manufacturers’ Institute), whose standards underpin every piece of published load data. Whether you’re assembling your first batch of centerfire rifle cartridges or your ten-thousandth, these principles apply equally: and every experienced reloader will tell you they follow them every session, not just when they remember.

    reloading safety: rifle cartridges under moody light

    Why Reloading Safety Depends on Habit, Not Luck

    The good news about reloading safety is that the risks are almost entirely preventable. Unlike a mechanical failure you cannot anticipate, nearly every reloading accident traces back to a skipped step, a momentary distraction, or a one-time exception that “seemed fine.” That’s precisely why rules exist: not to slow you down, but to make your process consistent enough that anything out of the ordinary stands out immediately.

    10 Essential Reloading Safety Rules

    • One powder on the bench at a time. Return the current canister to storage before opening another. Having two or more containers accessible simultaneously is the leading cause of wrong-powder incidents: and putting the wrong powder in a case is among the most catastrophic mistakes in reloading. The rule is absolute: one container out, everything else stored.
    • Verify the powder label every single time. Read the label before filling your measure, after filling it, and again mid-session if the session runs long. Powder canisters look remarkably similar. Cross-checking the label against your published load data takes three seconds and has prevented countless accidents.
    • Keep the bench clean and distraction-free. No screens, no children running in and out, no background noise that demands a response. Vihtavuori’s reloading safety guidance states it plainly: “Reload only when you can give it your undivided attention.” A clean, uncluttered bench also makes it far easier to notice anything out of place before it becomes a problem.
    • Verify your scale before every session. Zero the scale, then confirm it with a known calibration weight before you start. If you’re using a volumetric powder measure, periodically pull a thrown charge and weigh it to confirm the measure has not drifted. A scale that wanders silently is a serious hazard that no amount of careful technique can compensate for.
    • Inspect every charged case for powder level before seating the bullet. This is the catch for both double-charges and squib-load setups. Hold a flashlight across the row of charged cases: a case with no powder, or an obvious overfill, will stand out immediately. A double charge can generate catastrophic pressure in an instant; a squib, a bullet lodged in the barrel from an undercharged round, is equally dangerous if a second shot follows before the obstruction is cleared. Never skip this inspection.
    • Always wear eye protection at the bench. Primers can detonate during seating. Components can shift unexpectedly. SAAMI recommends safety glasses meeting ANSI Z87.1 standards for all reloading and shooting activities. Hearing protection matters at the range; eye protection matters the moment you sit down at the press.
    • Store powder and primers properly: and separately. Both should be kept cool, dry, and in their original labeled containers. Primers and powder must not share the same storage space: a mass primer detonation can set off nearby powder with seriously dangerous consequences. Keep quantities within your local legal limits and store everything away from heat sources, open flame, and other flammables.
    • Never use unlabeled powder or mix powders. If you cannot positively identify a powder from its original sealed container with the label intact, discard it per the manufacturer’s instructions. Mixing two smokeless powders, even ones with similar burn rates, creates an unknown propellant with unpredictable pressure curves. There is no safe way to evaluate an unknown mixture.
    • Recognize pressure signs and stop immediately. Flattened or cratered primers, hard bolt lift, sticky extraction, case head expansion, or a case that won’t release from the chamber are all warnings of excessive pressure. Stop shooting, stop loading, and investigate before proceeding. Do not rationalize a pressure sign away.
    • Always work from current published data: and cross-check two sources. Powder and bullet manufacturers publish reloading data produced by instrumented, controlled testing. Always begin from the published starting load and work up from there in small, deliberate increments: never exceed a published maximum. Cross-referencing two reputable published sources, such as a current printed manual and the component manufacturer’s own online data, adds a meaningful verification layer that catches errors in either source.

    The Mindset That Holds It All Together

    Rules matter most when they are applied consistently: every session, not just the first or when the stakes feel obvious. Experienced reloaders treat each loading session with the same sequence: same checks, same order, same inspections. That consistency is itself a form of reloading safety, because a routine that never varies means any deviation becomes immediately visible rather than something easy to rationalize away in the moment.

    If something feels off at the bench: an unusual resistance when seating a primer, a powder measure that seems to be throwing lighter than last session, a case that feels different: stop and investigate. The cost of pausing is a few minutes. The cost of ignoring a warning is potentially a damaged firearm, an injury, or worse.

    How LoadNode Keeps Your Data Organized and Cross-Checkable

    One of the quieter contributions to reloading safety is keeping accurate, detailed records. When you can look back at exactly what components you used, what charge weight you ran, and how those loads performed at the range, you have a data trail that helps you catch problems early: a load that suddenly shows a pressure sign compared against your prior range notes, for instance. LoadNode is built for precisely this: a structured reloading logbook that records your components, charges, brass preparation, and shooting results so your data is organized, searchable, and cross-checkable across every session.

    If you’re just getting started, our guide on how to start reloading walks through the equipment, process, and what to expect from your first sessions. If you’re still weighing the time and cost investment, is reloading worth it examines the numbers and value proposition honestly. And once your safety habits and process are solid, brass preparation for accuracy is where many experienced handloaders find their tightest groups.

    Handloading is an adult activity done at your own risk. LoadNode is a logbook and analysis tool: it never provides load data. Always develop loads from current published manufacturer data and work up safely.

  • The Essential Guide to How to Start Reloading

    The Essential Guide to How to Start Reloading

    If you’ve ever wondered how to start reloading, you’re not alone: thousands of shooters make the jump every year, drawn by the promise of better accuracy, lower cost per round, and real control over their own supply. This guide gives you the 30,000-foot view: what the reloading cycle looks like, which equipment categories you’ll need to cover, and the safety mindset that separates careful reloaders from cautionary tales. You won’t find load data here: that lives in your manual, and we’ll explain exactly why that matters. What you will find is a clear roadmap for doing this right from the very first session.

    how to start reloading: cartridges and a loading block on a bench

    Why Shooters Learn How to Start Reloading

    The reasons fall into three categories. Accuracy is the most compelling for precision shooters: factory ammunition is loaded to function across a wide range of chambers, while your handloads can be tuned to your specific rifle’s freebore and throat. Cost is the second driver: once your equipment is paid off, the per-round cost of centerfire rifle cartridges drops significantly. We’ve broken that math down in our post on whether reloading is worth it. The third reason is availability: if you’ve ever watched shelves empty during a shortage, the appeal of a personal component stockpile becomes very concrete, very fast.

    The Reloading Cycle: What Actually Happens at the Bench

    Every cartridge you load goes through the same sequence. The brass case is the heart of the process: it gets fired, recovered, and recycled through this cycle many times before it’s retired.

    1. Deprime and resize. A full-length sizing die squeezes the fired case back to specification and punches out the spent primer in a single press stroke. Case lube is essential here: skip it and the brass welds itself to the die.
    2. Inspect and prep the case. Check for cracks, measure overall length, trim if the brass has grown beyond spec, and deburr the case mouth. Most reloaders clean brass in this phase too, using a tumbler or ultrasonic cleaner.
    3. Prime. A fresh primer is seated into the cleaned primer pocket. Primers are the ignition source: seat them fully, handle them carefully, and keep them away from heat and impact.
    4. Charge with powder. A measured weight of propellant goes into the case. This is the most consequential step in the entire process. Every charge must come from current published load data, and every case should be visually inspected before you move on: a double-charge or a missed case is visible if you look.
    5. Seat the bullet. The projectile is pressed to the cartridge overall length specified in your data source. A micrometer-adjustable seating die makes this step repeatable from round to round.

    Simple in concept, demanding in execution: and exactly why process discipline matters more than speed.

    Equipment Categories Every New Reloader Needs to Cover

    The right starter setup depends on your cartridge, volume, and goals. Rather than a prescriptive shopping list: that’s what our reloading equipment list is for: here are the categories your bench must cover before you load a single round:

    • Press. The mechanical heart of the operation. Single-stage presses are the standard recommendation for beginners: one operation at a time, complete focus on each step.
    • Dies. Caliber-specific tooling that resizes, expands, seats, and crimps. A basic two- or three-die set covers most rifle and pistol cartridges.
    • Scale and powder measure. Every charge must be weighed or verified by weight. A digital scale is non-negotiable; many reloaders use a trickler and scale for final verification even when running a volumetric measure.
    • Calipers. Digital calipers measure case length, overall cartridge length, and seating depth. You’ll use them constantly.
    • Case prep tools. Trimmers, deburring tools, primer pocket cleaners, and a tumbler or ultrasonic cleaner round out a functional bench.
    • A current reloading manual. Not a category: a requirement. See below.

    Your Manual Is the One Thing You Cannot Skip

    Before you purchase a single component, buy a current reloading manual from a reputable bullet or powder manufacturer. This is where every charge weight, every starting point, and every warning for every component combination lives. That data is tested at measured pressure by engineers: it is not a suggestion, it is the safe boundary of operation for that specific combination of components.

    Cross-reference data across at least two current printed sources. The Sporting Arms and Ammunition Manufacturers’ Institute (SAAMI) sets the pressure standards that underpin all published data; their site explains why those limits exist and what exceeding them means. Never extrapolate beyond published maximums. Never use forum posts, secondhand data, or anything that cannot be traced to a current manufacturer’s publication.

    Safety Basics That Apply from the Very First Session

    Reloading has an excellent safety record because careful reloaders follow a short list of rules: consistently. If you’re figuring out how to start reloading, ingrain these before you touch a press:

    • One powder on the bench at a time. Label it, confirm it, put everything else away before the container is open. Powder mix-ups are catastrophic and completely preventable.
    • Verify every charge. Weigh it. Then look into the case before seating. A double charge in a rifle case is almost always visible: but only if you check every single time.
    • Eye protection, always. Primers can discharge. Brass can crack. The bench is not a place for bare eyes.
    • Work without distractions. Reloading interrupted is reloading where mistakes happen. Finish the step you’re on, or stop cleanly.

    For a thorough treatment of each of these points, see our post on reloading safety fundamentals.

    Log Everything from Day One

    Here’s what most beginner guides skip: the first loads you make are data, not just ammunition. Every combination of component, seating depth, and environmental condition produces a result you can learn from: but only if you recorded it. Experienced reloaders who struggle to replicate a previous result almost always share the same story: they didn’t write it down.

    This is where LoadNode fits into your bench workflow. It’s a precision reloading logbook and analysis tool: record your components, seating depths, chronograph results, and group data in one place, then query that history when something changes. What was different between the session where SD was 8 fps and the one where it jumped to 22? Without a record, you’re guessing. With one, you’re doing actual load development. When you’re ready to understand what those velocity numbers mean, our post on what a good SD looks like for reloading is a natural next step.

    Learning how to start reloading is genuinely straightforward: understand the cycle, cover the essential equipment categories, follow your manual like a rulebook, work safely, and record everything from the first round. The reloaders who get the best results over the long run aren’t the ones with the most expensive gear: they’re the ones with the most complete records.

    Handloading is an adult activity done at your own risk. LoadNode is a logbook and analysis tool: it never provides load data. Always develop loads from current published manufacturer data and work up safely.

  • Smart AI Group Analysis: What Your Groups Actually Tell You

    Smart AI Group Analysis: What Your Groups Actually Tell You

    You photograph a group, measure each bullet hole in LoadNode, and then tap Analyze with AI. Moments later, AI group analysis delivers something most precision reloaders have never had, not just a number, but a plain-English read of the geometry: a classification of the group’s shape, a summary of what the numbers suggest, and targeted observations tied directly to the geometry and velocity data you actually collected. This guide explains exactly what the feature reads, what it returns, and what it deliberately will not do.

    AI group analysis: a paper shooting target showing a bullet-hole group

    What AI Group Analysis Actually Reads

    The AI does not work from a photograph. LoadNode first has you measure the target manually, placing a pin on each bullet hole to extract precise X/Y coordinates for every shot in the group. That geometric data, combined with the per-shot chronograph velocities you recorded during the session, the load context you logged (charge weight, cartridge, bullet and powder names, and distance), and any optional weather you entered, is all that gets transmitted. No images. No personal information. Just the numbers you measured and the component names you typed.

    Three categories of input feed the analysis:

    Group geometry: the overall size (in inches, centimetres, or your preferred angular unit such as MOA), the mean radius of the cluster, the ratio of vertical spread to horizontal spread, and whether any single hole sits clearly apart from the rest. A group that strings twice as tall as it is wide carries fundamentally different diagnostic meaning than one that radiates equally in all directions.

    Velocity correlation: does each shot’s vertical position on the target track its recorded muzzle velocity? A bullet launched significantly faster than the session average will arrive higher downrange. When fast shots land high and slow shots land low, the AI points out that correlation, the same signal your standard deviation in muzzle velocity is already hinting at in the chronograph data. It reports the relationship it can see in the numbers; it does not prove a cause.

    Session conditions: temperature, wind speed, or lighting you entered are folded in as context. A crosswind reading gives the AI reason to interpret horizontal spread differently than it would in calm conditions.

    The 7 Pattern Types AI Group Analysis Returns

    After processing shape and velocity data, the tool classifies the group into one of seven pattern types:

    • Round: roughly symmetric scatter with no dominant axis. Often reflects normal random dispersion with no single identifiable cause.
    • Vertical: significantly more spread along the up/down axis than left/right. The primary suspect is muzzle-velocity variation; recoil management inconsistency is a close second.
    • Horizontal: the group strings left to right. Common contributors include crosswind, parallax not dialled to the actual target distance, trigger-technique inconsistency, or off-axis recoil.
    • Diagonal: a tilted string. This pattern can point to barrel–resonance effects interacting with a consistent torque vector, or stock and bedding influences.
    • Flyer: one shot sits clearly separated from an otherwise compact cluster. The AI reports how far that shot sits from the rest, so you can judge whether it is a genuine outlier or just ordinary scatter.
    • Mixed: no single axis dominates; dispersion is multi-directional with no clean pattern.
    • Inconclusive: the data is present but either too sparse or too ambiguous for a reliable classification. More shots are needed before drawing any conclusion.

    Each result comes with two to four specific observations drawn directly from your numbers, for example, “your vertical spread is 2.3× your horizontal spread” or “your three fastest shots correspond to the three highest holes”, giving you something concrete to examine rather than a generic recommendation.

    Non-Load Suggestions: What to Investigate, Not What to Change

    Alongside its observations, AI group analysis returns one to four actionable suggestions, all non-load. This is the most deliberately constrained aspect of the feature. The suggestions never touch charge weights, powder types, bullet seating depth, or any recipe variable. They point instead to things you can go and check for yourself:

    • Technique: recoil management, consistent head position, and grip pressure are invisible in chronograph data but visible in group shape.
    • Optics: parallax dialled short of or past your actual distance, or a reticle with slight cant, can both produce systematic point-of-impact shift that looks like a genuine dispersion pattern.
    • Rest and position: bag fill, bipod cant, or sling tension under load can each introduce repeatable directional bias.
    • Wind: even a modest 5 mph crosswind moves a bullet horizontally at 100 yards more than many reloaders expect, particularly with lighter projectiles.
    • Component consistency: primer seating depth uniformity and case trim length affect ignition and pressure consistency without appearing clearly in any individual velocity reading.
    • Sample size: when three or five shots are insufficient to support a firm conclusion, the AI will say so and recommend shooting a larger group before acting on a pattern.

    Why no load advice at all? Because load selection is not what this tool is for. Choosing a charge weight requires a current published manual and the judgment of an experienced reloader familiar with their specific components and firearm. AI group analysis is designed to help you understand patterns in the data you have already collected, not to prescribe what goes in a case. That boundary is fundamental to how LoadNode operates, and every analysis ends with a reminder to consult your published reference data before changing anything.

    Pro Access, Privacy, and Monthly Credits

    When you run an analysis, only the numeric group geometry, the per-shot velocity values, the load context you logged (charge weight, cartridge, bullet and powder names, and distance), and any weather you chose to include are transmitted. No photograph is uploaded. No personal identifiers are attached to the request.

    AI group analysis is a LoadNode Pro feature. LoadNode Pro will be a one-time purchase, not a subscription, and includes ten analyses per month, enough to cover multiple sessions or ladder tests across a month of range work. LoadNode is in pre-release beta right now, so Pro goes on sale when the app reaches the stores. Extra credit packs will be available at launch and never expire, so you can stock up before a heavy testing season without worrying about a cut-off date.

    Before running your first analysis, a few companion guides will make the results easier to read. The mean radius vs. group size guide explains why mean radius describes a group’s centre tendency more reliably than extreme spread alone. The MOA group measurement guide covers how angular size scales with distance. If the analysis flags velocity variation as a likely contributor, the SD and ES guide explains what those figures mean in practice.

    Once you have run a few sessions through LoadNode, the pattern names and observations become intuitive, and the notes you accumulate start to compound across range days in a way that a standalone ballistics calculator cannot replicate.

    Handloading is an adult activity done at your own risk. LoadNode is a logbook and analysis tool: it never provides load data. Always develop loads from current published manufacturer data and work up safely.

  • The Smart Way to Sync Reloading Data Across Your Devices

    The Smart Way to Sync Reloading Data Across Your Devices

    If you reload for more than one rifle, work at both the bench and the range, or recently upgraded your phone, you already know the frustration: every hard-won note is stranded on a single device. The ability to sync reloading data across all your devices turns months of painstaking load development into an asset you can actually rely on: instead of a session log that might vanish the next time you crack a screen or factory-reset a handset.

    sync reloading data: rifle cartridges lined up in a row

    Why Reloaders Risk Losing Years of Work

    Handloaders build something genuinely irreplaceable: velocity strings, primer comparisons, seating-depth notes, range photos, and lot numbers accumulated across dozens of sessions. Most reloading apps store everything locally by default, which is sensible for privacy, but that approach leaves your records exposed to a cracked screen, a failed update, or a stolen phone.

    Shooting forums are full of threads from reloaders who upgraded their phone and found their entire development history had disappeared. Some had been logging for three or four years. A cloud-sync strategy prevents that entirely, but it has to be done on the right terms: no subscription billing, no forced account creation, and no third party harvesting your data on the side.

    How LoadNode Lets You Sync Reloading Data

    LoadNode’s cloud sync is an optional feature included in the one-time Pro upgrade: no recurring subscription, ever. LoadNode is in pre-release beta, and Pro goes on sale at launch for a one-time $29.99. To sync reloading data between devices, sign in with your email address and the 6-digit sign-in code that arrives in your inbox (or a password if you’ve set one). There is no “magic link” to track down: just a short numeric code that keeps setup fast at the bench.

    After signing in on each device you use, a single tap on Sync now pushes your data to the cloud and pulls down any changes recorded elsewhere. LoadNode uses a last-write-wins approach: the most recently changed record wins across all devices. For a personal reloading logbook where you’re the sole editor, this is exactly the right model: fast, predictable, and conflict-free.

    What Gets Synced

    • Your complete reloading records and range session history
    • App settings including unit preferences (MOA⁄MIL, imperial⁄metric) and cost setup
    • Photos attached to your sessions via cloud photo backup

    That means if you adjust your unit display on the phone, the change follows you to the tablet. If you photograph a target group at the range and attach it to a session, it’s waiting for you when you get back to the bench. Your settings and your records stay in step across every device on the same account.

    Local-First: The Bench Work Never Needs Signal

    LoadNode is designed local-first: logging sessions, viewing records, measuring groups, and every on-device statistic work offline with no account required. Only the two features that are online by nature, AI group analysis and cloud sync, need a connection. Cloud sync is not a paywall between you and your data. It is a purely optional layer for reloaders who use more than one device or want a safety net when they eventually move to a new phone.

    This architectural choice matters more than it sounds. File synchronization systems that treat a remote server as the authoritative source of truth will leave you with a broken or degraded app any time connectivity drops. LoadNode never does that. Your device always holds a fully functional local copy; when a network is available and you tap Sync now, the app will sync reloading data to and from the cloud in a single pass.

    Protecting Your Privacy When You Sync

    LoadNode has no advertising and no behaviour tracking. When your sessions are stored in the cloud, they are protected by row-level security: the database enforces at the server level that only your account can read your records. There is no aggregate data mining and no profiling. Your load history, session notes, and photos are private to your account. The only things that ever leave it are what you explicitly send: the numbers behind an AI group analysis, and crash reports scrubbed of any identity or reloading data. Our privacy policy lists every provider in the chain. See the LoadNode FAQ for further detail on how data is stored and who can access it.

    Prefer to Stay Fully Offline? Use the Encrypted Local Backup

    Cloud sync is not for everyone, and LoadNode does not push you toward it. If you’d rather keep everything on-device, the free password-encrypted local backup exports your entire logbook to a single portable file you can store anywhere you choose: on a computer, a USB drive, or a secure cloud folder of your own. Our complete guide to backing up your reloading data walks through the local backup workflow step by step. The two approaches work together as well: belt-and-suspenders reloaders can run both and have full redundancy.

    Getting Started Takes About Two Minutes

    Here’s the complete setup flow for cloud sync in LoadNode:

    1. Unlock Pro from the Settings screen (one-time payment, no subscription: available when LoadNode leaves beta).
    2. Tap Sign in and enter your email address.
    3. Check your inbox for the 6-digit sign-in code and enter it: or use a password if you’ve already set one.
    4. Repeat on each additional device you want to keep in sync.
    5. Tap Sync now to run the first full push-and-pull.

    From that point on, a tap of Sync now is all it takes to keep every device current. If you’re still evaluating your options, the comparison of the best reloading log apps shows how LoadNode’s one-time-Pro, local-first approach differs from the subscription-based alternatives on the market.

    The goal of LoadNode has always been to keep your most careful work, every velocity string, every session note, every attached photo, organised and accessible wherever you are. Cloud sync is how that promise follows you from the bench to the range to your next device, with a single one-time cost and no compromise on privacy.

    Handloading is an adult activity done at your own risk. LoadNode is a logbook and analysis tool: it never provides load data. Always develop loads from current published manufacturer data and work up safely.

  • The Essential Reloading Data Backup Guide

    The Essential Reloading Data Backup Guide

    Every serious handloader knows how much goes into developing a load that actually performs: the components, the range sessions, the careful measurements accumulated across months of testing. A thorough reloading data backup protects everything that work produced: your firearm profiles, your load jobs, your velocity strings, your groups, and the app settings that keep your workflow consistent. Without one, a single phone failure or device upgrade can erase records you’ll never fully reconstruct. This guide explains what a proper backup looks like, why encryption is non-negotiable, and how to make the habit stick before you actually need it.

    reloading data backup: a boxed set of loaded rifle cartridges

    Why Your Reloading Records Are Harder to Replace Than You Think

    Think about what lives in your reloading log: firearm profiles, load jobs linked to specific components, charge ladder results, chronograph velocity strings, group measurements, component costs, and inventory counts. These records represent hours at the bench and at the range, and years of refined experience. Unlike published reference data you can look up in a manual, your personal records exist nowhere else. A phone upgrade with a forgotten export, an accidental factory reset while troubleshooting an app, or a device dropped at the range can wipe them out instantly: and there is no manufacturer’s website where you recover what you built yourself.

    A notebook solves part of the problem, but it can burn, get soaked, or simply stay home on the wrong day. A spreadsheet on a single laptop is one hard drive failure away from the same outcome. For context on why redundancy matters at every level, the Wikipedia article on data backup explains the 3-2-1 rule: keep three copies of your data, on two different types of media, with one copy stored off-site. It’s a principle built for enterprise IT that maps cleanly onto a handloader’s records.

    What a Complete Reloading Data Backup Should Include

    A reloading data backup is only as useful as it is complete. A partial export that captures your load jobs but skips your firearm profiles, or saves velocity data without the linked groups, leaves gaps that are just as painful to rebuild as a total loss. A comprehensive backup should cover every category your workflow depends on.

    • Firearm profiles (chambering, barrel length, optic setup)
    • Load jobs and associated component records
    • Charge ladders and test results
    • Chronograph velocity strings
    • Group measurements and accuracy records
    • Component inventory and cost data
    • App preferences and unit settings
    • Target photos (optional but valuable)

    Target photos deserve a call-out on their own. They are visual evidence of what your ammunition produced in a specific session. Including them in a backup ties the image to the record: so you’re not relying on memory to connect a photo to a particular test six months later. When photos are an optional inclusion rather than a forced one, the decision is worth making deliberately rather than defaulting to “skip.”

    Why Encryption Is Non-Negotiable

    A backup file sitting unencrypted on a cloud drive, in an email attachment, or on a shared USB drive is readable by anyone who accesses that storage. For a reloading log, that means information about your firearms, your components, and your shooting activity is exposed. Encryption is the right answer: but only when it is implemented properly, not symbolically.

    AES-256-GCM is the standard that does this correctly. AES-256 uses a 256-bit key: a length that is computationally infeasible to brute-force with current or near-future hardware. The “GCM” component (Galois/Counter Mode) adds authenticated encryption: it not only scrambles the data but mathematically verifies that the file has not been altered between the moment it was written and the moment it is restored. When the encryption key is derived from your password via PBKDF2, a key-stretching algorithm that makes guessing attacks computationally expensive, the protection is genuine, not decorative.

    The practical consequence of password-derived keys: lose the password, lose access to the backup. There is no reset link, no customer-service recovery option, no backdoor. That is intentional: the key exists only in your memory, never on any server, which is precisely what makes the encryption trustworthy.

    Putting the 3-2-1 Rule to Work for Your Records

    Once a backup file exists, where it lives matters as much as whether it exists. The 3-2-1 rule applied to a handloader: your live data on your device (copy one), a backup exported to iCloud Drive or Google Drive (copy two, off-site and on a different medium), and a copy saved to a home computer or emailed to yourself (copy three). A backup exported through your phone’s OS share sheet can reach any of those destinations in under a minute. That redundancy turns a lost device from a catastrophe into a minor inconvenience.

    How LoadNode Handles Reloading Data Backup

    LoadNode’s reloading data backup is built directly into Settings under Backup & Restore: a single workflow that covers completeness, encryption, and portability without requiring a subscription upgrade.

    Everything in One Encrypted File

    A LoadNode backup captures all your data in a single encrypted file: every firearm, recipe, load job, charge ladder, chronograph velocity string, group measurement, cost record, and inventory entry, plus your app settings. Target photos can be included optionally: useful if you want the full visual record, skippable if you prefer a smaller file. Nothing your workflow depends on is left behind.

    AES-256-GCM and PBKDF2 in Practice

    Every backup is encrypted with AES-256-GCM before it leaves the app. The key is derived from your password via PBKDF2 and is never stored in LoadNode or on any server. A lost password means the backup cannot be opened: there is no recovery path. LoadNode makes this clear when you create a backup. Store the password in a password manager, or choose something you will genuinely remember; treat it with the same seriousness as any other important credential.

    Restore: Merge or Replace All

    To restore, pick the backup file, enter the password, and choose how to handle what is already on the device. Merge folds the backup’s records into your existing data: the right move when you’re migrating to a new phone where you’ve already entered a few records. Replace all clears the current data and restores the backup completely, which is the clean choice for a full migration or a recovery from loss.

    Backup & Restore is free for all LoadNode users: it is not gated behind a Pro subscription. LoadNode is local-first: your data lives on your device, not on a remote server. Cloud sync is a separate optional Pro feature. The backup tool exists independently of it, because data portability is a basic right, not a tier benefit.

    Make Backup a Regular Habit

    The most effective backup strategy is the one you actually follow. After a productive range session, new velocity data logged, records updated, observations noted, is the natural moment to export a fresh copy. In LoadNode it takes under a minute from Settings, and the file can go straight to cloud storage through the share sheet. A backup from last week is worth more than one from last season; one from last season is still worth more than nothing.

    If you’re evaluating your options for tracking handloading records, the best reloading log apps guide covers what separates genuinely useful tools from ones that create a new data-loss risk. If you’re weighing whether the hobby justifies the setup, is reloading worth it looks at costs and returns honestly. For specific questions about how LoadNode works day to day, the FAQ is the fastest place to find answers. A season of careful testing and record-keeping deserves more than a notebook in a range bag: LoadNode is built to keep your reloading data encrypted, portable, and entirely in your control.

    Handloading is an adult activity done at your own risk. LoadNode is a logbook and analysis tool: it never provides load data. Always develop loads from current published manufacturer data and work up safely.

  • Garmin Xero C2 Live Capture: The Complete Guide

    Garmin Xero C2 Live Capture: The Complete Guide

    LoadNode now fully supports the Garmin Xero C2: and it does something the app has never done before: live capture. Press Go Live, take a shot, and the velocity lands on your charge ladder the instant the bullet crosses the radar. No ending the session, no pulling a file, no retyping numbers off the device screen. This guide covers what the Garmin Xero C2 adds, how live capture works in LoadNode, and how it compares to the C1 you may already own. LoadNode is currently in pre-release beta, so live capture is available to beta testers today and to everyone at launch.

    Garmin Xero C2 shot log in LoadNode: Go Live and Sync shots from chrono, chrono connected

    What the Garmin Xero C2 does differently

    The original Xero (C1) is a passive logger: it records a session on the device, and an app reads that saved session back afterward. The Garmin Xero C2 is a live, two-way chronograph: it can stream each shot to a paired app in real time while the string is still in progress. LoadNode uses that channel directly, so the app mirrors what the device sees, shot by shot, with the same per-shot velocity the Xero itself measured.

    That single difference changes the range workflow. Instead of shooting a group, walking through the device menus, and syncing at the end, you open the charge you’re testing, tap Go Live, and watch the log fill as you fire. Standard deviation and extreme spread update on every shot, so you can see a string tightening or opening up in real time.

    Go live: real-time capture on your ladder

    Garmin Xero C2 live capture in LoadNode: two shots landed with running SD and ES

    Live capture is scoped to the charge you have open. When you press Go Live, LoadNode starts a session on the Garmin Xero C2 and every detected shot is written straight to that charge’s shot log: the same list, the same running SD/ES and long-press editing you get from a manual entry or a saved-session pull. Fire a shot, it appears; fire the next, it appears. A one-tap undo removes the last shot if a sighter or a neighbour’s shot sneaks onto the radar.

    Move to the next charge simply by opening its log: the device session keeps running and new shots follow the charge you’re on. Pressing End Session (or closing the log) ends the session cleanly on the device and saves it. Because every live shot is tagged with the device’s own session and shot identity, re-syncing that saved session later never double-counts a thing: the shots you captured live are recognised and skipped.

    Setting up a live session the right way

    Garmin Xero C2 live session setup in the LoadNode app: projectile, bullet weight and velocity range

    Before the first shot, LoadNode asks for the same three things the Garmin app does, because they drive measurement quality:

    • Projectile type: rifle, pistol, shotgun, air rifle, arrow or other.
    • Bullet weight: pre-filled from the bullet on your recipe. This feeds the device’s energy and power-factor math.
    • Velocity range: for firearms, either 600–1,700 fps or 1,700–5,000 fps. This calibrates the radar’s measurement window; air rifle and arrow use the slow band automatically. Picking the band your load actually lives in keeps readings clean.

    Your last setup is remembered, so a repeat trip to the same rifle is two taps: Go Live, then Start.

    Garmin Xero C1 vs C2: which one, and does LoadNode support both?

    LoadNode supports both: fully. Everything you can do with a C1, you can do identically with a Garmin Xero C2: browse the sessions stored on the device, pick one, and pull it onto a charge. The C2 simply adds the live option on top. Here’s the honest breakdown:

      Xero C1 Garmin Xero C2
    Pull a stored session onto a charge Yes Yes: exactly like the C1
    Browse the device’s saved sessions (type, weight, shots, avg) Yes Yes
    LoadNode “Go Live” (real-time capture) Yes
    When velocities can reach the app After you end & sync The instant each shot fires: or after, your choice
    Per-shot SD / ES on the ladder Yes (after sync) Yes (live & after)
    Start a session with projectile / weight / velocity range On the device From the app or the device

    In short: the workflow you already know from the C1 carries over one-to-one, and the Garmin Xero C2 adds the live layer on top. Shoot now and sync later, or watch it land in real time: either way the velocities end up in the same place, attached to the exact charge weight, ready for charge comparison and your DOPE.

    Why live capture matters for load development

    Load development is a discipline of small differences. Watching SD and ES resolve shot by shot means you catch a bad string while you can still do something about it: a flyer, a chrono that clipped a shot, a charge that’s clearly noisier than the one before it. When the velocities land on the ladder automatically, there’s no transcription step to introduce an error, and nothing to forget before you pack up. The number LoadNode stores is the number the Garmin Xero C2 measured, carried across at full precision instead of rounded off by hand.

    From there it flows into everything else: population SD/ES computed the chronograph-correct way, an honest comparison across the charges in your ladder, and a truer muzzle velocity to build your DOPE card on. If you’re new to chronographs generally, start with how to use a chronograph, then come back to live capture.

    The Xero measures each shot with Doppler radar rather than the optical sensors older chronographs use: see how ballistic chronographs work for the background. LoadNode’s job starts the moment the shot is measured: turning that number into an honest read of your own data.

    LoadNode is a logbook and analysis tool. It never tells you what to load: no charge weights, no recipes, no “work up to.” Always consult current published load data from your component manufacturers and follow safe handloading practice. You are responsible for the safety of every round you build.

  • Full Length vs Neck Sizing: The Honest Accuracy Verdict

    Full Length vs Neck Sizing: The Honest Accuracy Verdict

    Ask ten handloaders about full length vs neck sizing and you will get ten confident, contradictory answers. It is one of reloading’s oldest arguments: and the honest verdict, backed by decades of data, is not what tradition told us. This guide lays out the full length vs neck sizing trade-offs on accuracy, case life and reliability, and explains why most serious precision shooters have quietly landed on one side.

    Full length vs neck sizing: fired rifle brass cases in a bin ready to resize

    What each method does

    Full-length (FL) sizing resizes the entire case, body, shoulder and neck, back toward factory dimensions and bumps the shoulder back a controlled amount. Neck sizing works only the neck, leaving the fire-formed body and shoulder untouched so the case stays fitted to your specific chamber. That difference in what gets touched is the whole debate in one sentence.

    Full length vs neck sizing: the accuracy verdict

    The old wisdom said neck sizing must be more accurate because the case stays perfectly fire-formed to the chamber. But the data pushes back. Sierra Bullets’ ballistics techs found decades ago that proper full-length sizing of bottleneck cases produced the best accuracy of every method they tried, and much of the modern benchrest world agrees: careful FL sizing keeps average group size the same while shrinking the worst groups. In the full length vs neck sizing comparison, a well-set-up FL die with minimal shoulder bump and controlled neck tension at least equals neck sizing: and does it with far better consistency round to round.

    Case life and reliability

    Neck sizing’s real advantage is case life: working less brass means less thinning and stretching, so cases can last noticeably longer between trims. The catch is reliability: after about 5 firings a neck-sized case grows enough that chambering gets stiff, and a hard bolt-close in a match or the field is a real liability. Full-length sizing chambers effortlessly every time, which is why it is mandatory for semi-autos and any ammo shared across rifles. This is where full length vs neck sizing stops being about tiny group differences and starts being about whether the round chambers when it counts.

    When neck sizing still makes sense

    Neck sizing has not vanished. If you shoot a single dedicated bolt gun, chase absolute case life on expensive brass, and hand-cycle every round so a slightly stiff bolt-close is no problem, neck-only sizing can still serve you well: particularly with a collet die that avoids overworking the neck. The trouble is that it asks you to babysit your brass and accept the reliability risk, and it does not deliver the accuracy edge it was once promised to. For most shooters, that trade no longer pencils out, which is exactly why the field has drifted the other way.

    The modern consensus

    Most precision shooters now full-length size every firing with a die set up to bump the shoulder back only about 0.001–0.002″ from fired length, and to control neck tension with a bushing or honed die. You get FL’s reliability and consistency without over-working the brass, capturing most of neck sizing’s case-life benefit anyway. In other words, the real answer to full length vs neck sizing is that how well you set the die matters more than which camp you join: consistent shoulder bump and neck tension is the accuracy lever, not the label on the die. See the practical breakdown from L.E. Wilson for more.

    Whatever you choose, measure your results. LoadNode links each recipe, including your sizing method, shoulder bump and neck tension, to the groups and velocity data it produced, so you can see for yourself which process your rifle actually prefers. Settle full length vs neck sizing with your own targets. Pair it with solid brass prep and consistent neck tension and the debate mostly disappears.

    Handloading is an adult activity done at your own risk. LoadNode is a logbook and analysis tool: it never provides load data. Always develop loads from current published manufacturer data and work up safely.