Author: loadnode

  • Neck Tension and Bushing Dies: The Key to Consistent SD

    Neck Tension and Bushing Dies: The Key to Consistent SD

    If your velocities scatter more than your load deserves, the quiet culprit is often neck tension: how firmly the case neck grips the bullet. Get it consistent and your SD falls; let it wander and no powder tweak will fully fix it. Here is what neck tension really is and how bushing dies and mandrels help you control it.

    Neck tension and bushing dies: rifle brass cases whose neck tension is set with bushing dies

    In this guide

    What neck tension is

    “Neck tension” is the grip the case neck exerts on the seated bullet. In practice it comes from interference fit: the neck is sized down a little smaller than bullet diameter, so it springs back against the bullet and holds it. Handloaders usually talk about it as the amount the neck inner diameter is sized below the bullet, commonly on the order of a thousandth or two of an inch. Strictly it is a grip force, not just a dimension, but the sizing amount is how we control it.

    Why it drives SD

    Consistent neck tension means each bullet releases at a consistent pressure, which makes your velocity consistent: the foundation of a low SD and ES. If some necks grip harder than others, those rounds build pressure differently and leave at different speeds, and your velocity spread opens up no matter how carefully you weighed the powder. Uneven neck tension is one of the most common hidden causes of a stubbornly high SD.

    Standard dies and the expander ball

    A conventional sizing die squeezes the neck down, then drags an expander ball back through it on the way out to set the final inner diameter. It works, but pulling that ball through can introduce inconsistency and neck runout, and it does not give you fine control over how much tension you end up with. For many shooters it is perfectly adequate; for those chasing single-digit SD, it is often the first thing to upgrade.

    Bushing dies

    A bushing die lets you drop in an interchangeable bushing of a specific diameter to size the neck to exactly the tension you want, often skipping the expander ball entirely. You choose the bushing based on your loaded neck diameter and brass spring-back (brass typically springs back around a thousandth after sizing), which gives you direct, repeatable control over neck tension: and usually better concentricity. Die makers such as those covered at Ultimate Reloader offer bushing options for most cartridges.

    Mandrels

    Another popular approach is an expander mandrel: size the neck slightly undersize, then open it back up from the inside with a mandrel to a precise diameter. Because the final sizing is done on the inside, any neck-thickness variation is pushed to the outside, leaving a uniform inner diameter and good bullet-to-bore concentricity. Many precision reloaders use a bushing to do most of the work and a mandrel to set the final tension.

    Annealing keeps it consistent

    No die can fully compensate for brass that hardens unevenly over its life. That is why annealing belongs in this conversation: it keeps the necks at a consistent springiness reload after reload, so the tension you set with a bushing or mandrel stays the tension you actually get. Bushing dies set it; annealing keeps it.

    Track it in LoadNode

    Neck-tension changes are just another variable to test, and the way to know if they worked is your velocity data. LoadNode computes live SD and ES per charge so you can see whether a die or mandrel change actually tightened your spread, alongside solid brass prep. Change one thing, measure, and let the numbers decide.

    Handloading is an adult activity. LoadNode is a logbook and analysis tool: it never provides load data. Always develop loads from current published data, start low, and work up safely.

  • Ballistic Coefficient and Twist Rate: Choosing a Bullet for Distance

    Ballistic Coefficient and Twist Rate: Choosing a Bullet for Distance

    Pick the wrong bullet for your barrel and no amount of load tuning will save you: it might not even stabilize. Understanding ballistic coefficient and twist rate is how you choose a bullet that both flies well at distance and actually stabilizes out of your rifle. Here is what each means and how they fit together.

    Ballistic coefficient and twist rate: polymer-tipped rifle bullets built for a high ballistic coefficient

    In this guide

    What ballistic coefficient (BC) is

    Ballistic coefficient is a measure of how well a bullet overcomes air resistance: essentially how aerodynamic it is. A higher BC means less drag, so the bullet retains velocity better, drops less, and drifts less in the wind the farther it goes. BC rises with a sleek, pointed, boat-tailed shape and with sectional density (heavier bullets for a given diameter). For the formal definition, see ballistic coefficient.

    G1 vs G7 BC

    You will see two BC numbers for many bullets. They are referenced to different standard projectile shapes: G1 is based on an older flat-based form, while G7 is based on a long boat-tail form that closely resembles modern long-range bullets. For sleek match bullets, the G7 BC stays more constant across the velocity range and predicts long-range trajectory more reliably, whereas the G1 BC for the same bullet changes more with speed. Rule of thumb: for long-range bullets, prefer the G7 number and feed it to a matching G7 ballistic solution.

    Twist rate and bullet stability

    Twist rate, written like 1:8 (one full rotation in eight inches), is how fast the rifling spins the bullet, and that spin is what stabilizes it gyroscopically in flight. A faster twist is a smaller number (1:7 is faster than 1:10). The key relationship: longer, heavier bullets need faster twist to stabilize. Too slow a twist for a long bullet and it will not stabilize: you will see keyholing and terrible accuracy as the bullet tumbles.

    The stability factor (Sg)

    Stability is quantified by the gyroscopic stability factor (Sg). Below about 1.0 the bullet is unstable; most authorities want roughly 1.4–1.5 or higher for full stability and to realize the bullet’s full BC. Marginal stability (around 1.0–1.4) can leave a bullet flying but underperforming, shaving its effective BC. You can estimate Sg with a stability calculator from your twist, bullet length, velocity, and conditions before you ever buy the bullets.

    Matching the bullet to your barrel

    Bullet for the caliber Twist needed
    Light / short Slower twist is fine (larger number)
    Mid-weight Medium twist
    Heavy / long, high-BC Faster twist (smaller number)

    In short: choose the highest-BC bullet your barrel’s twist can fully stabilize. If your twist is on the slow side, you are limited to shorter, lighter bullets; a fast twist opens the door to the heavy, high-BC projectiles that shine at distance. Always check the bullet maker’s recommended minimum twist for the bullet you want.

    Air density changes stability

    Stability is not fixed: it changes with the air. Thinner air (high density altitude: hot or high elevation) makes a bullet easier to stabilize, raising Sg; cold, dense air lowers it. A bullet that is marginally stable on a freezing morning at sea level may be perfectly fine on a hot day in the mountains: and vice versa. When in doubt, give yourself stability margin. Record your chosen bullet and its BC in your LoadNode recipe so it travels with the load.

    Handloading is an adult activity. LoadNode is a logbook and analysis tool: it never provides load data. Always develop loads from current published data, start low, and work up safely.

  • Barrel Break-In: Necessary or Myth?

    Barrel Break-In: Necessary or Myth?

    Few topics start an argument faster among shooters than barrel break-in. One camp swears a careful shoot-and-clean ritual makes a barrel foul less and shoot better; another calls it a waste of barrel life and cleaning solvent. So which is it? Here is an honest look at what break-in is, the case on each side, what the evidence really supports, and a sensible way to handle a new barrel.

    Barrel break in: a new scoped rifle in its case at the start of barrel break in

    In this guide

    What barrel break-in is

    A typical break-in procedure is a series of shoot-and-clean cycles: fire one shot, clean the barrel thoroughly (including copper), and repeat for several rounds; then fire short groups of two or three, cleaning between, for a while longer. The idea is to smooth the tiny machining marks in the throat and bore while they are fresh, so the barrel fouls less and cleans more easily over its life. Procedures vary widely from one source to the next, which is itself a clue about how settled the science is.

    The case for break-in

    Proponents argue that a fresh throat has microscopic tool marks and burrs that grab copper. Firing and cleaning early, the theory goes, lets the bullet gently lap those high spots down before fouling builds up in them, leaving a smoother bore that copper-fouls less and is easier to maintain. Shooters who break barrels in often report exactly that: less fouling and quicker cleaning afterward. Rougher, mass-produced factory barrels are the ones most likely to show a difference.

    The case against

    Skeptics, including a number of respected custom barrel makers argue that a properly finished, lapped barrel has little to gain, and that burning rounds and aggressively cleaning a new barrel mostly wastes a slice of its finite life. Their point: every shot is a shot off the clock, and scrubbing a throat hard does not obviously help a barrel that was already smooth from the maker. For premium hand-lapped barrels, many makers say little or no break-in is needed.

    What the evidence actually says

    Honestly, the hard evidence is thin and mixed. Most support for break-in is anecdotal, and controlled testing is scarce and inconsistent. What nearly everyone agrees on is narrower: quality matters. A smoothly finished barrel needs little; a rough one may benefit from a light break-in. And regardless of break-in, cleaning a new barrel and watching how it fouls is just good practice.

    A sensible approach

    • Follow your barrel maker’s specific recommendation first: they know how that barrel was finished.
    • For a premium, hand-lapped barrel, a brief routine (or none) is usually plenty.
    • For a rougher factory barrel, a light shoot-and-clean break-in is reasonable: just don’t turn it into a 100-round ritual.
    • Clean copper out early and note how quickly it returns; that tells you when the bore has settled.
    • Don’t chase accuracy conclusions during break-in: the barrel and your zero are still settling.

    Count break-in rounds toward barrel life

    Whatever you decide, those rounds count. LoadNode tracks round count per barrel from the very first shot, so your break-in is part of the barrel’s life record: useful later when you are watching for throat erosion and trying to judge how much accurate life is left. Log it, and let the data tell the story instead of guesswork.

    Handloading is an adult activity. LoadNode is a logbook and analysis tool: it never provides load data. Always develop loads from current published data, start low, and work up safely.

  • Density Altitude for Shooters: What It Is and Why It Matters

    Density Altitude for Shooters: What It Is and Why It Matters

    Two range days, same load, same distance, and your come-ups are different. Often the reason is density altitude. It is the single number that captures how thin or thick the air is, and at distance it quietly rewrites your dope. Here is what DA is, what drives it, and why it matters more the farther you shoot.

    Density altitude for shooters: a high mountain valley where thin air changes your ballistics

    In this guide

    What density altitude is

    Density altitude (DA) is the altitude, in a standard atmosphere, at which you would find the air density you are actually experiencing. In plain terms it rolls temperature, barometric pressure, and humidity into one figure that tells you how dense the air is. “High” DA means thin air; “low” DA means dense air. It is the same concept pilots use, defined formally as density altitude.

    Why it matters for shooting

    Air is what slows your bullet down. Thinner air (high DA) means less aerodynamic drag, so the bullet retains velocity better, drops less, and drifts less: your trajectory flattens. Denser air (low DA) means more drag, more drop, and more wind deflection. Up close this is invisible; stretch out past a few hundred yards and a big DA swing can move your elevation by a meaningful amount. A dope card trued on a cold morning at sea level will not match a hot afternoon in the mountains.

    What drives density altitude

    • Temperature: hotter air is less dense, so heat raises DA.
    • Altitude / pressure: higher elevation (lower pressure) raises DA.
    • Humidity: humid air is actually less dense than dry air, water vapor is lighter than the nitrogen and oxygen it displaces, so higher humidity nudges DA up a little.

    Put simply: hot, high, and humid all push DA up (thin air); cold, low, and dry pull it down (dense air).

    Using DA at the range

    Practical shooters record the conditions or the DA directly when they shoot, and true their ballistic solution to them. When the air changes, the solution changes. Note that DA is about air density, not shooting up- or downhill; that angle effect is a separate correction. Modern ballistic apps will take current atmospherics directly, but the habit that matters is logging the conditions alongside your results so your data means something later.

    A quick example

    Say you true your dope on a cold morning near sea level, low density altitude, dense air. Then you drive to a hot, high range and the air thins out: density altitude climbs, drag drops, and your bullet now falls less than your card predicts. Fail to adjust and you will shoot high. How much depends entirely on the cartridge, the distance and the size of the DA swing, which is precisely what a ballistic solver is for: run the new conditions through yours rather than carrying a rule of thumb from an article. The fix is simply truing your solution to the conditions in front of you, not the ones from last week.

    Track conditions in LoadNode

    LoadNode records each session’s conditions: temperature, humidity, pressure, and density altitude right alongside your velocities and groups in the load job. That way, when you compare two strings shot on different days, you can see the air they were shot in, not just the numbers. Powders differ in how much their velocity shifts with temperature, and that shift shows up in your own chronograph data before it shows up anywhere else. Log the conditions with every string and you can see whether your velocities actually move with the weather (see reading a velocity ladder). Which powder to use is a question for current published manufacturer data, not for us.

    Handloading is an adult activity. LoadNode is a logbook and analysis tool: it never provides load data. Always develop loads from current published data, start low, and work up safely.

  • Annealing Brass: Why and How

    Annealing Brass: Why and How

    If your loads seem to drift after a few reloads, SD creeping up, the occasional split neck, the culprit is often work-hardened brass. Annealing brass resets that hardening so your neck tension stays consistent and your cases last longer. Here is why it works, how to do it, and the safety rule you must not break.

    Annealing brass: rifle brass case necks under warm light, as in the annealing process

    In this guide

    Why brass needs annealing

    Brass work-hardens every time it is fired and resized: the metal gets stiffer and springier with each cycle. Left unchecked, the case necks grip the bullet with steadily changing force from one reload to the next, and eventually they get brittle enough to crack and split. Annealing softens the neck and shoulder back toward a consistent state, restoring uniform behavior and extending case life. The metallurgy is the same annealing used across metalworking.

    How annealing helps accuracy

    The payoff for precision is consistent neck tension. How tightly the neck holds the bullet affects how the bullet releases and how pressure builds, which feeds straight into velocity consistency. Brass that is annealed on a schedule releases bullets more uniformly, so your SD and ES stay low and stable instead of wandering as the brass hardens over its life.

    Temperature and what not to do

    Annealing is about getting the neck and shoulder to the right temperature for a brief moment: commonly cited around 700–800°F for a short dwell, not a bright glow. Too little does nothing; too much ruins the brass. Use temperature-indicating lacquer (Tempilaq) or a machine for repeatability. The unbreakable rule: never let heat reach the case head or body. The head must stay hard to safely contain pressure: a softened case head is dangerous. Keep the heat at the neck and shoulder, and keep it brief.

    Annealing methods

    • Flame (a torch with a case spinner, checked with Tempilaq): inexpensive and effective, but harder to make perfectly repeatable shot to shot.
    • Salt bath: a molten-salt dip: effective but messy and less common today.
    • Induction (e.g., AMP-style machines): heats by electromagnetic induction for highly repeatable, consistent results: the gold standard, at a price.

    How often to anneal

    For top-end consistency, many precision shooters anneal every firing; others do it every two or three. What matters most is doing it on a consistent schedule so every case in a batch has seen the same treatment: uniformity across the batch is the goal, not a magic interval.

    Do you actually need to anneal?

    Honestly, not everyone does. If you load plinking ammo and retire brass after a few firings, you can skip annealing and never notice. Where it earns its keep is precision and brass economy: if you are chasing single-digit SD across many reloads, or you have invested in premium brass you want to last, consistent annealing keeps neck tension, and therefore your velocity, stable over the life of the case. Match the effort to your goal: casual volume shooting, optional; serious precision, well worth it.

    Track firings in LoadNode

    Annealing only helps if it is consistent, which means knowing how many times each batch has been fired. LoadNode lets you record brass lots and prep in your recipes, so you can keep your annealing on schedule. Pair it with solid brass prep and watch your SD settle down.

    Handloading is an adult activity. LoadNode is a logbook and analysis tool: it never provides load data. Always develop loads from current published data, start low, and work up safely.

  • Brass Prep for Accuracy: A Step-by-Step Checklist

    Brass Prep for Accuracy: A Step-by-Step Checklist

    Consistent ammunition starts with consistent brass. Good brass prep is the unglamorous work that quietly lowers your SD, tightens your groups, and makes your cases last: and it is mostly about doing the same thing the same way every time. Here is a clear, step-by-step checklist, plus an honest note on which steps actually matter.

    Brass prep for accuracy: clean rifle brass cases in a bin ready for case preparation

    In this guide

    Why brass prep matters

    Every dimension that varies from case to case, neck tension, case volume, shoulder position, trim length, adds variation to your ammunition, and variation is the enemy of precision. Uniform brass means more uniform pressure and velocity, which shows up as a lower SD and ES and tighter groups. It also keeps your cases alive longer. And good prep stretches your brass budget: well-prepped, annealed cases can be reloaded many times before they are retired, which matters when quality match brass is not cheap and supply can be tight.

    The brass prep checklist

    1. Clean the brass (tumble, ultrasonic, or wet) so grit does not scratch your dies or chamber.
    2. Inspect and cull: toss any case with neck cracks, head separation signs, or loose primer pockets.
    3. Resize with lube. For repeatable feeding and good brass life, full-length size and set your shoulder bump back a thousandth or two from fired length.
    4. Deprime (usually done during sizing).
    5. Trim to length. Brass flows forward when sized, so trim to a uniform length at or below max case length: consistent length means consistent case mouths.
    6. Chamfer and deburr the case mouth so bullets seat smoothly without shaving.
    7. Clean the primer pockets so primers seat to a uniform depth.
    8. Anneal periodically to keep neck tension consistent (more below).

    Optional precision steps: uniforming primer pockets, deburring flash holes, sorting brass by weight or volume, neck turning for tight-neck chambers, or using an expander mandrel for uniform neck tension: can help at the margins, mostly for benchrest-level work.

    Which steps actually matter

    If you are chasing diminishing returns, prioritize the steps that move SD: consistent sizing (shoulder bump), uniform trim length, consistent neck tension, and annealing. These directly affect how the round chambers and how the bullet releases. The fancy extras, neck turning, flash-hole deburring, matter far less for most shooters than simply doing the core steps the same way every single time. Consistency beats elaborateness.

    Common brass-prep mistakes

    Most brass-prep problems are habits, not skill:

    • Inconsistent shoulder bump: resetting your sizing die differently each session changes how the round chambers and adds variation.
    • Too much (or leftover) case lube: over-lubing dents shoulders; failing to clean it off invites slipping and grit.
    • Skipping the trim: cases that grow unevenly give you uneven mouths and inconsistent seating.
    • Mixing headstamps and lots: different brass has different capacity and weight, so keep batches separate.
    • Never annealing: letting neck tension drift over a dozen reloads.

    None of these are hard to avoid; they just take a little discipline and the same routine every time.

    Track your brass in LoadNode

    LoadNode lets you record your brass and lots in each recipe, note how many times a batch has been fired, and amortize brass cost across its life. Tie that to your velocity stats and you can actually see whether your prep is paying off in lower SD. Next, read up on annealing cartridge brass: the step that keeps neck tension consistent over the life of your brass.

    Handloading is an adult activity. LoadNode is a logbook and analysis tool: it never provides load data. Always develop loads from current published data, start low, and work up safely.

  • Best Reloading Log Apps in 2026

    Best Reloading Log Apps in 2026

    A good reloading logbook turns a pile of range notes into something you can actually learn from. If you are hunting for the best reloading log app, here is an honest look at the popular options in 2026: what each is genuinely good at, and where it falls short. (Full disclosure: LoadNode, included below, is our app: we have tried to be fair about everyone, including ourselves.)

    Best reloading log apps: LoadNode reloading log app showing firearms, recipes and load jobs

    In this guide

    What to look for in a reloading log app

    • Real logging: firearms, recipes (bullet/powder/primer/brass), and load jobs: not just a notes field.
    • Velocity stats: live SD and ES, computed correctly.
    • Group tracking: ideally measuring group size from a photo and tying it to the load.
    • Offline: the range rarely has signal.
    • Cost & honesty: a fair price model, and a tool that helps you read your data: not one that tells you what to load.

    The popular options

    RCBS Reloading: free, and a familiar name. Its load log lets you record components, charge, velocity, and group, and attach a photo. A solid, simple free logbook, light on analysis.

    Vihtavuori Reload: free and notably polished, with a load diary that records test-shooting data and automatic velocity statistics. The catch: it is built around Vihtavuori powders, so it is less neutral if you burn other brands. Read more at Vihtavuori.

    Hornady Reloading: primarily a reloading-data and guide app; useful for looking things up, more reference than a personal logbook.

    Reloading Assistant: a capable logbook that ties together recipes, cost records, and chronograph data in a diary format.

    Reloading Studio: modern, web-based software for managing, tracking, and cataloguing your whole reloading workflow, components, and firearms; more of a desktop manager than a range-side phone app.

    Ballistic-X: excellent at one thing: measuring group size from a photo of your target. It is a target analyzer rather than a full reloading log.

    LoadNode (ours): built to close the whole bench-to-target loop: recipes and load jobs, charge ladders with live SD/ES, Garmin Xero sync, photo group measurement in MOA and MIL, AI group analysis, and cost tracking: offline-first, priced as a one-time purchase with no subscription when it launches (it is in pre-release beta today), and it never gives load data.

    Comparison at a glance

    App Type Best for
    RCBS Reloading Free logbook Simple, free logging with photos
    Vihtavuori Reload Free (VV powders) Vihtavuori shooters wanting a clean diary
    Hornady Data / guide Looking up reloading data
    Reloading Assistant Logbook + cost + chrono Component- and cost-focused logging
    Reloading Studio Web software Desktop workflow & inventory management
    Ballistic-X Photo group analyzer Measuring groups from a photo
    LoadNode Integrated bench-to-target The whole workflow, offline-first, one-time

    App details and pricing change: check each one’s current store listing before you commit. LoadNode is the exception: it is in pre-release beta and not on the stores yet, so see our pricing page for the launch price.

    One more thing worth weighing: the pricing model. The market splits between free apps, one-time purchases, and subscriptions: and most handloaders strongly prefer to buy once and own their logbook rather than pay every month to keep access to their own data. If you are choosing a tool you will lean on for years, factor that in alongside the feature list.

    Which is best for you?

    If you want a free, no-frills logbook, RCBS is a safe start. Shoot Vihtavuori exclusively? Vihtavuori Reload is hard to beat for free. Want a desktop inventory manager, Reloading Studio; just measuring groups, Ballistic-X. If you want one app that does the entire precision workflow, recipes, live velocity stats, chronograph sync, group measurement, and cost, without a subscription, that is what we built LoadNode to be. Browse our reloading resources to see how the pieces fit together.

    Handloading is an adult activity. LoadNode is a logbook and analysis tool: it never provides load data. Always develop loads from current published data, start low, and work up safely.

  • How to Get Velocity Data Off Your Garmin Xero

    How to Get Velocity Data Off Your Garmin Xero

    The Garmin Xero C1 is one of the easiest chronographs to set up on a bench, and it has earned a reputation for accuracy: but its velocity numbers are only useful if they make it into your load record. This guide explains how the Xero captures data, how the ShotView app fits in, and the options for getting those velocities into your reloading log without fat-fingering every number.

    Garmin Xero velocity data: LoadNode connected to a Garmin Xero C1 chronograph over Bluetooth

    In this guide

    How the Garmin Xero works

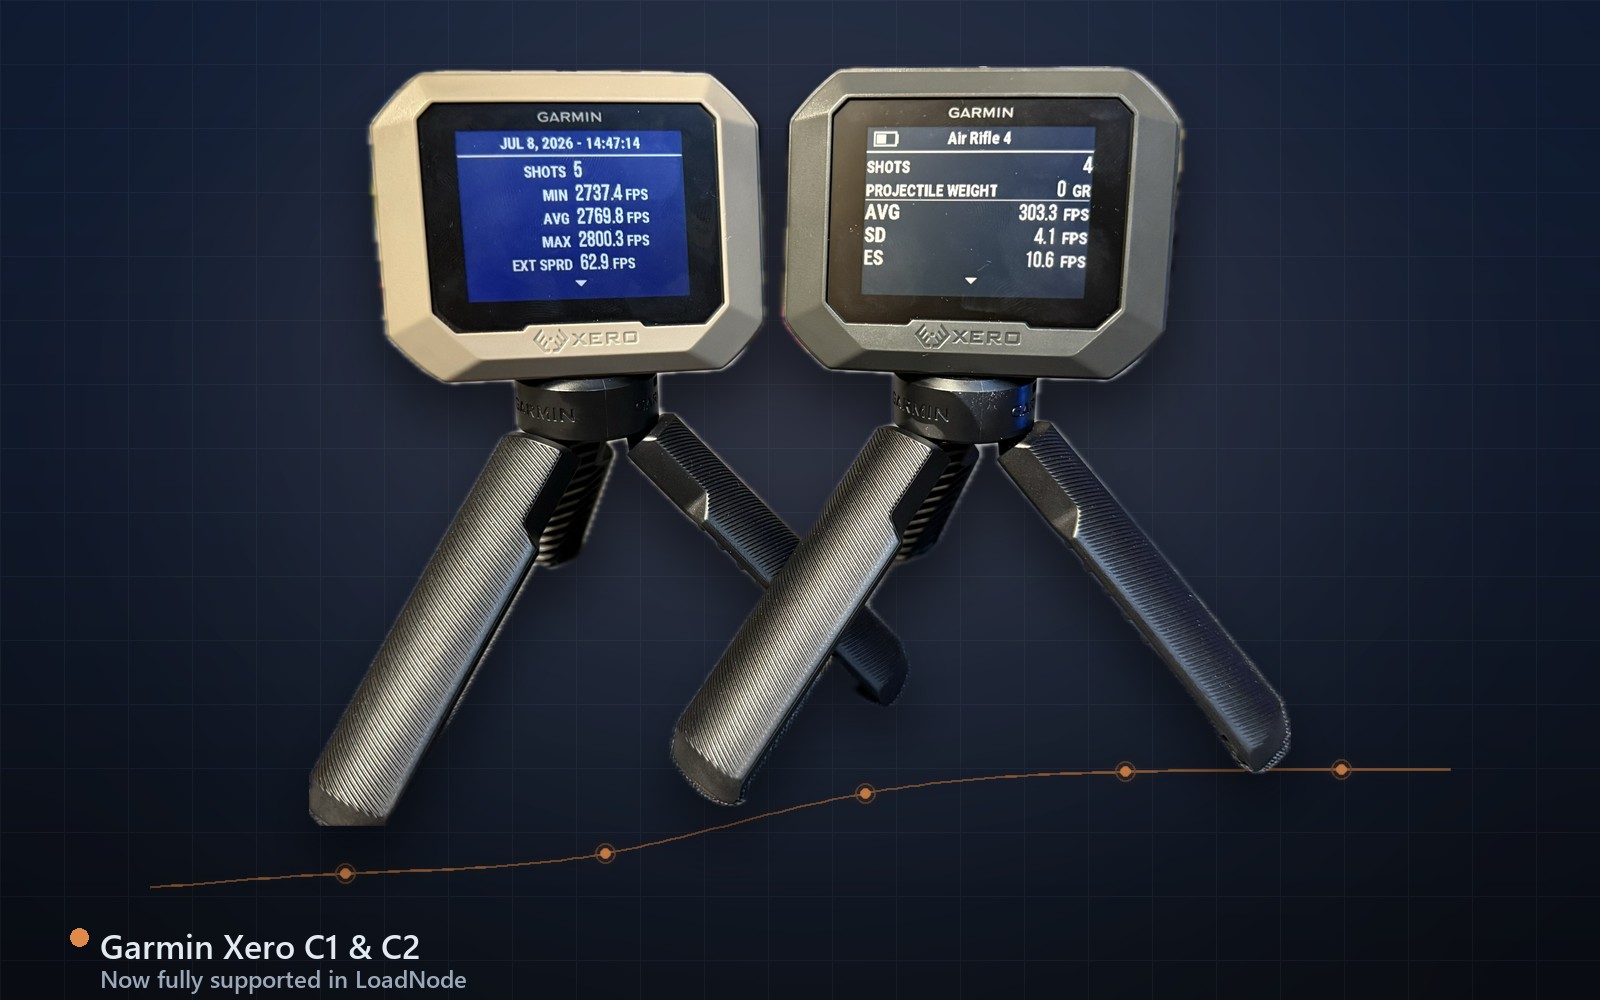
    The Garmin Xero C1 is a compact Doppler radar chronograph. You set it beside the muzzle, and for each shot it measures muzzle velocity directly: no shooting through fragile optical sensors or skyscreens. It records each shot in a session and computes the string statistics you care about on the device itself: average velocity, standard deviation, and extreme spread, among others.

    The ShotView app

    The Xero pairs over Bluetooth with Garmin’s free ShotView app on your phone, where you can watch shots land in real time, name and review sessions, and see their stats. ShotView is a great companion for the chronograph, but it is not a reloading log: it does not know your charge weight, seating depth, primer, or which group those velocities produced. For details on the device and app, see Garmin support.

    Option 1: manual entry

    The simplest path is to read the velocities, off the Xero screen or in ShotView, and type them into your logbook or reloading app by hand. It works with any chronograph, but it is slow, and it is easy to transpose a digit on a cold, windy range. For a quick few shots it is fine; for a full charge ladder across many charges, it gets tedious fast.

    Option 2: automatic sync into your log

    The better path is to pull the Xero’s saved session straight into your load record over Bluetooth. LoadNode does this with the Xero C1: shoot your string, end the session on the Xero, then tap Sync in your charge ladder and pick the session: every shot drops into the right charge, no transcription. The velocities arrive already attached to the load that produced them.

    Why linking velocity to the load matters

    A velocity number on its own is trivia. Tied to a specific charge, seating depth, and group, it becomes load development. With the data in your log you can compute a meaningful SD, judge whether two charges really differ (see finding a velocity node), and correlate velocity with where the shots landed. That correlation is the whole point of chronographing in the first place.

    Tips for clean chronograph data

    A few habits make your velocity data trustworthy. Place the Xero in a consistent position relative to the muzzle each time, shoot enough rounds for a meaningful SD (five is a minimum, ten is better), and end the session on the Xero before you sync so the string is complete. Above all, keep track of which charge each session belongs to so nothing gets mixed up later. Garbage in, garbage out applies to chronograph data as much as anything: one tidy, complete session is worth more than three rushed ones.

    The Garmin Xero in LoadNode

    In LoadNode, the Xero C1 connects over Bluetooth and drops a completed session straight onto your charge ladder: SD and ES recompute the moment those shots land, and the string stays linked to your recipe, charge, and the group you measured. The Garmin Xero C2 is supported as well, including live shot-by-shot capture while the string is still in progress; support for other chronographs is on the way. Either way, you can always enter velocities by hand on a glove-friendly keypad if you prefer. LoadNode organizes your data; it never tells you what to load.

    Handloading is an adult activity. LoadNode is a logbook and analysis tool: it never provides load data. Always develop loads from current published data, start low, and work up safely.

  • How to Track Throat Erosion (and Barrel Life)

    How to Track Throat Erosion (and Barrel Life)

    Every barrel is a consumable. Learning how to track throat erosion tells you when your accuracy decline is the barrel wearing out, not your load, and helps you squeeze the most life out of it. This guide covers what erodes a throat, how it shows up on target, roughly how long barrels last, and how to monitor yours.

    How to track throat erosion: a close-up of a rifle barrel and muzzle where throat wear occurs

    In this guide

    What throat erosion is

    The throat (or leade) is the short section of bore just ahead of the chamber, where the rifling begins and the bullet first engages. Every shot blasts it with intense heat, pressure, and friction, and over time that erodes the throat: it wears and lengthens. The practical consequence: the point where your bullet meets the rifling moves forward, so a bullet seated to the same length now has farther to travel (more jump) before it touches the lands. For background on barrel wear, see gun barrel.

    How throat erosion affects accuracy

    As the throat erodes, several things drift: velocity often climbs for a while and then becomes erratic, SD and ES tend to worsen, and groups eventually open up. Many shooters keep accuracy alive for a time by chasing the lands: seating bullets progressively farther out to maintain their preferred jump (see seating depth and jump). Eventually you run out of seating depth or magazine length, or the barrel simply hits a “cliff” where it no longer shoots to standard. That is the end of its accurate life.

    Typical barrel life by cartridge

    Barrel life varies enormously, and any number is a ballpark: your load, how hot you run strings, and how picky you are about accuracy all move it. As very rough guidance:

    • Mild cartridges (e.g., .223 Rem, .308 Win): often 3,000–5,000+ rounds of accurate life.
    • Popular mid-size (e.g., 6.5 Creedmoor): commonly around 2,000–3,000 rounds.
    • Hot, overbore magnums (e.g., 6.5-284, .26 Nosler, hard-run .338s): far less: sometimes well under 1,500 rounds.

    These are broad ranges, not promises. A barrel run cool and clean outlasts the same barrel run hard.

    What accelerates throat wear

    • Heat: rapid strings without letting the barrel cool are the biggest accelerant.
    • High pressure and large powder charges relative to bore (overbore cartridges burn throats fast).
    • Sustained high round counts in a single session.

    You cannot stop erosion, but you can slow it: let the barrel cool between strings, avoid unnecessary max-pressure loads, and do not dump long rapid strings when you do not need to.

    How to track throat erosion

    1. Log round count per barrel: the single most important number.
    2. Periodically measure your CBTO to the lands (your touch point). As that measurement grows over time, the throat is eroding forward.
    3. Watch your velocity and SD/ES trends for that barrel: a rising or newly erratic velocity is a clue.
    4. Track best group over time so you can see when accuracy starts to fall off.

    Track it in LoadNode

    LoadNode is built for exactly this. Each rifle can hold multiple barrel profiles, each with its own round count, a “life used” estimate, and its best group and best SD. Because every load job stores the jam (touch) CBTO, you can watch your throat measurement move against round count across the barrel’s life: a real throat-erosion timeline rather than a guess. When you retire a barrel, you decide whether to keep its history. Pair it with velocity tracking to catch the decline early.

    Handloading is an adult activity. LoadNode is a logbook and analysis tool: it never provides load data. Always develop loads from current published data, start low, and work up safely.

  • Is Reloading Worth It? An Honest Cost Breakdown

    Is Reloading Worth It? An Honest Cost Breakdown

    It is the first question every new handloader asks: is reloading worth it? The honest answer is “it depends”: on what you shoot, how much, and why. Below is a clear-eyed look at the costs, the break-even math, where the savings actually are, and the reasons people reload that have nothing to do with money. (All dollar figures here are rough, illustrative ranges that vary widely by market and component: track your own to know for sure.)

    Is reloading worth it: a large pile of once-fired brass cases ready to reload and save money

    In this guide

    What a handload actually costs

    Your per-round cost is the sum of the bullet, the powder charge, the primer, and the brass: with brass divided across the number of times you reload it (good rifle brass often lasts many firings). Bullets are usually the biggest single component, especially premium match bullets. Because brass is reused, your second and later loadings are cheaper per round than the first.

    The upfront equipment cost

    Reloading has a start-up cost: a press, dies, a scale, calipers, and sundries. A basic single-stage setup commonly runs a few hundred dollars to get going, and you can spend far more on premium gear. That cost is a one-time investment you amortize: your break-even is simply the equipment cost divided by how much you save per round. Shoot a lot, and the gear pays for itself quickly; shoot a box a year, and it takes a while.

    Savings depend heavily on the cartridge

    This is the crux. For cheap, mass-produced ammo the margin is thin; for premium and large cartridges it is huge:

    • Bulk pistol (e.g., 9mm): factory plinking ammo is cheap, so handloading saves relatively little: sometimes barely worth the time unless you shoot in volume or want a specific load.
    • Precision rifle (e.g., 6.5 Creedmoor match): quality factory match ammo is expensive, while components cost much less per round: the savings add up fast and you can often out-shoot factory.
    • Magnums and large/obscure cartridges (e.g., .338 Lapua): factory ammo can be eye-wateringly expensive per round, so the per-round savings from handloading are largest here: and sometimes you simply cannot buy the load you want.

    The pattern: the more expensive (or rarer) the factory ammo, the more reloading saves: in money and in availability.

    The reasons that aren’t about money

    Plenty of handloaders would reload even if it broke even, because cost is not the only payoff:

    • Accuracy & tailoring: a load tuned to your rifle usually beats generic factory ammo: the real reason most precision shooters reload.
    • Availability: when shelves are empty, components often are not, and you can keep shooting.
    • Obsolete & wildcat cartridges: reloading keeps rifles running that factories abandoned.
    • The craft: a lot of people simply enjoy it.

    So, is reloading worth it?

    If you only shoot small amounts of cheap factory ammo, the pure dollar case is weak once you count your time. But if you shoot precision rifle, magnums, large volumes, or value tailoring your accuracy: reloading is usually worth it, and the precision payoff often matters more than the savings. The broader background on the practice is well covered under handloading.

    Know your real numbers

    The only way to truly answer the question for you is with your own numbers. LoadNode tracks the cost of every component, amortizes your brass automatically, and shows your per-round cost, savings vs factory, and break-even: plus cost-versus-consistency, so you can see what your accuracy is actually costing. It reports your data; it never tells you what to buy or load. Browse more reloading resources to dig in.

    Handloading is an adult activity. LoadNode is a logbook and analysis tool: it never provides load data. Always develop loads from current published data, start low, and work up safely.